A good set of race headers accomplishes one major task in particular; they help your high-powered engine to breathe more efficiently, and a byproduct of that efficiency is more power, especially when the headers are built properly.
In this article, we’ll cover some of the finer points of fabricating a sweet set of race headers, covering things to look for during the process, challenges that may occur, and even a couple of welding tips that will make the process easier to digest.
The folks at Burns Stainless, along with the guys at REF Unlimited, recently invited us to follow along with their process of creating a set of headers that exhaust the energy provided by a state-of-the-art supercharged small-block LS engine.
Theory And Background
Tuning the exhaust system is just as critical as tuning the engine, and in order to cover the rest of the process, we need to provide a bit of background.
In a four-stroke engine, as the exhaust valve opens after the power stroke, the cylinder pressure initiates exhaust blowdown. At this time, a pressure wave traveling the speed of sound (1,700 feet per second) travels down the exhaust pipe, and as the valve continues to open, the exhaust gases, moving over 350 feet per second, flow over the valve seat and out the exhaust pipe. These two different aspects – gas particle flow and pressure wave generation – are what we’re trying to streamline during the creation of a proper set of race headers.
A quick video of the inner workings at Burns Stainless
“The objective of the exhaust is to remove as many gas particles as possible during the exhaust stroke. The proper handling of the pressure waves in the exhaust can help us to this end, and even help us “supercharge” a naturally-aspirated or nitrous engine,” says Vince Roman of Burns Stainless.
Each pressure wave arrives at the end of the exhaust pipe, and part of it is then reflected back towards the cylinder as a negative pressure (vacuum) wave.

The engine and vehicle parameters required for Burns to use their X-Design program, which assists in specifying optimum header dimensions and materials.
If the pressure waves can be timed properly, through the selection of the proper tubing lengths, collector diameters, and pipe arrangement in the collector, the exhaust pulses will work to scavenge each cylinder, and also help to start the intake flow into the cylinder on the next go-round.
“Since the pressure waves travel at near the speed of sound, the timing of the negative wave can be controlled by the primary pipe length for a particular rpm. The trick is to tune an exhaust system to produce a negative wave of the proper strength timed to occur at cylinder overlap,” Roman explains.
Using a proprietary parametric exhaust modeling computer program called X-Design, Burns is able to give the fabricator a solid starting point for header construction.
This program takes into account a multitude of factors; manifold type, number of valves per cylinder, camshaft specifications, header configuration, cylinder head style, and even the race fuel an engine will consume.
Once the information is loaded into the program, it will then spit out recommended dimensions for the header, from tubing diameter to collector size and more.
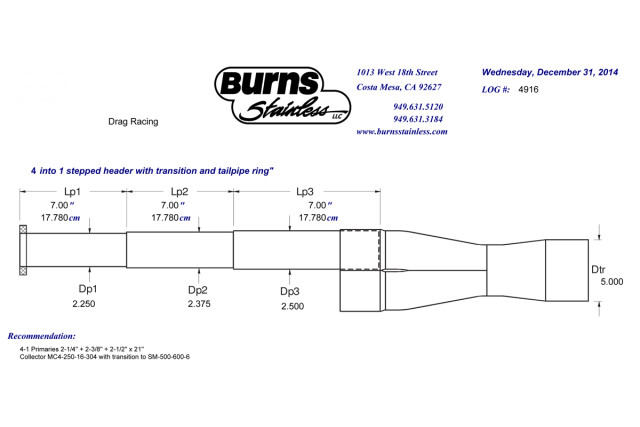
X-design spit out these parameters for the headers constructed as part of this article; it was the job of Holman and Clouser to reproduce these parameters as closely as possible.
Tip #1 – Material Selection
For the headers constructed here, 304 stainless steel was chosen. Stainless steel (in both 304 and 321 grades) has exceptional high temperature characteristics, especially when compared to much-heavier mild steel and even aluminum.
One advantage to using stainless material is its low coefficient of thermal conductivity, meaning that no ceramic thermal barrier or header wrap is required to keep the exhaust energy inside the pipe – the steel accomplishes that task as a function of its low-carbon construction. 304 stainless is much more common, and costs less than the aircraft-grade 321 material, making it a common choice among fabricators during header construction, unless the engine in question uses a turbocharger, in which case 321 is a better-performing material due to its high-temperature fatigue resistance.
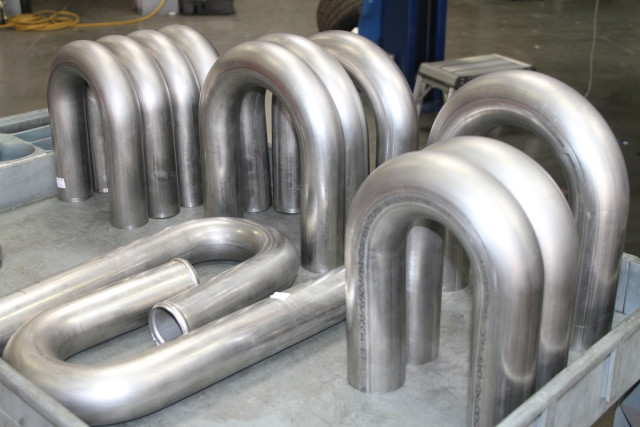
Some of the assortment of parts used in this header build - 304 stainless U-bends, Burns merge collectors and six-inch mufflers, and stainless flanges designed specifically for the cylinder heads on this vehicle.
“These many characteristics, such as superior heat retention properties, high temperature fatigue resistance, and to a lesser extent, the cosmetic value of a non-rusting finish, combine to make stainless steel an ideal choice for headers and exhaust systems,” says Roman.
In terms of weight, although aluminum is much lighter than stainless steel, exhaust tubes undergo a great deal of stress during the engine’s heating and cooling cycles, making aluminum an unsuitable material for header construction.
“It is important to note that yield stress for metals is a function of temperature, with most metals becoming weaker (i.e. lower yield strength) with increasing temperature,” says Roman.
An Extra Tip - Sensor Placement
If the user has a set of EGT probes, the positioning of these items also need to be taken into account. More importantly, every single one needs to be positioned at the same distance from the port to ensure consistency in the reading from each cylinder. Burns suggests 1.5-inches from the port exit as a minimum. This particular application also had the probes laid slightly back from vertical to assist in valve cover removal in the pits.
Oxygen sensor location also needs to be taken into account during the fab process. “The rule of thumb is to install the oxygen sensors from the three o’clock to nine o’clock position so they’re never aiming down,” says Holman. Roman adds that the reason behind this is so that condensed water will not pool around the sensor, as it will cause the sensors to break due to thermal shock once the exhaust gases hit the sensor.
Along the same lines, mild steel and titanium are also not the optimum material for header fabrication.
“Typical 1010 carbon (mild) steel conducts 219% more heat per foot than do the types of stainless steel we use in header fabrication. By contrast, quite a bit more heat stays inside the stainless header tubes and does not get passed into the surrounding air. By not allowing the contraction of the cooling gases as they flow down the tubes, more exhaust velocity is retained which promotes better scavenging at the collector. This retention of velocity increases the overall header efficiency,” says Roman.
With the modeling software at hand, Burns is able to determine not only the optimum lengths of each header tube, but also whether a step, or multiple steps will help the engine to perform most efficiently. The software also spits out recommended material amounts required to produce the header design specified.
Tip #2 – Tubing Length
The biggest challenge to making a proper set of race headers is easily the process of making them fit into the car, and that’s where REF Unlimited’s Greg Holman and Rob Clouser come into the picture.
“For these headers, we ran the engine’s particulars through our software, specified the sizing and materials needed to meet those dimensions including bend radiuses and collectors, then REF took those dimensions and made everything fit into the car,” explains Roman.
The trick is to tune an exhaust system to produce a negative wave of the proper strength timed to occur at cylinder overlap. – Vince Roman, Burns Stainless
“The first thing we have to deal with is what the customer’s looking for in general,” says REF’s Greg Holman. “We also have constraints to consider in terms of what Burns suggests for maximizing performance. Everything is a give-and-take.”
Left: Double-checking the outside diameter of some of the tubing. Right: Cutting off the flanged portion of the mufflers - these get V-band connections welded to one end to permit easy removal of the bullhorns.
In practice, the application required a bit of massaging from the original specifications suggested by Burns; as this particular car has factory front framerails, concessions needed to be made in order for everything to clear. REF needed to add a bit of extra length in the largest pipe diameter, or last step.
Tip #3 – Checking Clearances
Holman says that when a car is dropped off for a header installation and a discussion is had with the vehicle owner, he can just about visualize where each of the tubes will end up in order to maximize the header’s performance – a skill that comes with years of experience building race headers. This likely won’t be the case for a first-time builder.
“Another concern we have to watch for is the location of the collector. We have to determine how much room there is at the exit point, and whether there is the physical room to fit the parts. The collectors were so long in this application that we only had so much room left to fit the tubes into the collector between the frame and where the collector and muffler exit point is,” says Holman.
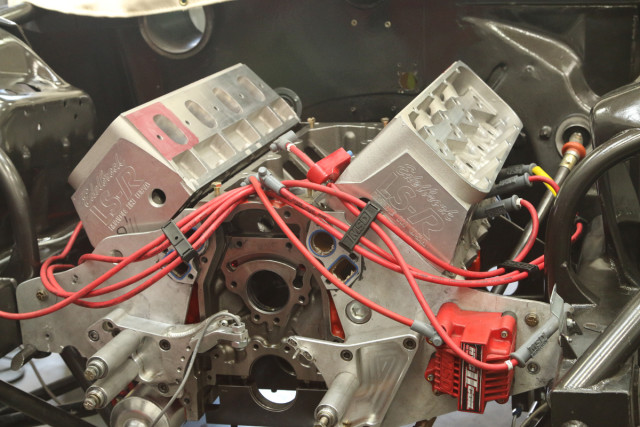
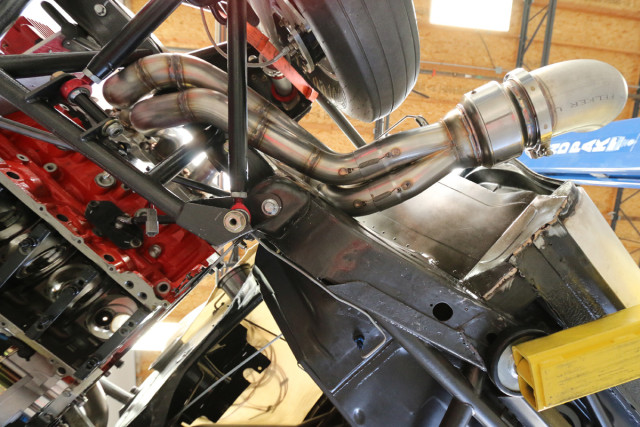
The Edelbrock LS-R-equipped LS engine used to fabricate the headers for this article. The collector exit location will be between the tire and leading edge of the door on each side.
Checking for steering clearance, master cylinder clearance, starter clearance, and other components that are installed in the car is a critical step of the process. The driver’s side of the vehicle will typically be the tightest location in terms of clearance, since steering components typically can’t be altered.
“We have to physically make sure that the header tubes are also in an order to where they can come in and out of the car. You have to consider removal of the cylinder head in the car and where the plugs can be pulled after every pass – all of that has to be considered as well,” Holman explains. “So not only do we need to take into account what Burns suggested in this instance for header lengths, we also have to consider what the car owner needs in terms of a service-friendly racecar.”
With the exit point on this car between the front tire and the leading edge of the firewall, the collector was placed first – the collector can’t be moved once the fabrication process begins. Conversely, Holman says that in an application where the header exits underneath the car, the collector location can be changed slightly during the process, if necessary, to ensure proper positioning.
“Once the collector is in place, you have to figure out which is going to be your longest tube – it’s usually the driver’s side, furthest tube forward. When we determine length, we try to get every single pipe as close to the length as possible. If it must be longer for some reason, it’s always in the last step if the headers use multiple diameters,” says Holman.
Various steps of the tube mockup process. It's important in this application to place the collector/muffler assembly into position and work backward towards the cylinder head, as the muffler assembly can't move due to its location between the tire and body.
It’s not really a one-way street – every step of the process is a compromise. – Greg Holman, REF Unlimited
Another quick tip Holman suggested is to use a socket and extension installed onto the spark plug during tube layout – this ensures that plug access won’t be hindered by the final tube positioning. He also works to ensure that plug wire clearance is sufficient to prevent burned plug wires and boots.
“It’s not really a one-way street – every step of the process is a compromise,” says Holman.
Tip #4 – The Use Of Merge Collectors
A merge collector does what the name says – it allows the exhaust gases to merge within the collector. The reason for using a merge collector is to allow the high flow and high velocity gases to increase and broaden the engine’s torque curve as much as possible all the way to the horsepower peak. The merge collector must be designed for the particular engine, and Burns does this with the X-Design software.
“The most critical area is the outlet of the merge collector – its shape and diameter. In a highly developed racing engine, the collector outlet interacts in an organic way with elements as far removed as the intake valve and camshaft and all the way to the tailpipe,” says Roman.
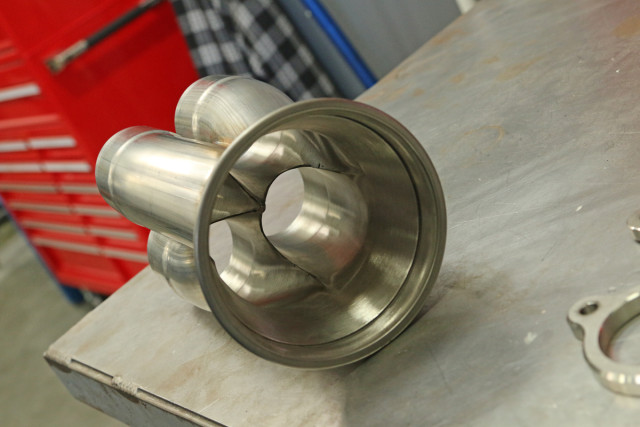
The craftsmanship inside the merge collector is evident in this photo. By putting the spike on the end of the incoming pipes, the collector helps to scavenge the flow from each adjacent pipe as the engine fires in sequence.
“For drag racing and similar applications where a tailpipe is not required, megaphones fitted with reverse cones are invariably the best option. They produce maximum horsepower and maintain the highest and smoothest torque curve. Megaphones also offer the highest potential power past the peak without compromising the lower end of the power band on well-developed engine combinations with optimally short-header tube lengths and a well-chosen collector outlet diameter.”
Tip #5 – Stop The Cracks
All stainless steel needs to be purge welded. For the uninitiated, purge welding is using argon gas to remove all of the oxygen inside the tube during the welding process, and there are a number of reasons for doing this.
“If you don’t get rid of the oxygen before you weld on the tube, your weld will be very rough and porous on the inside; it’s called a cauliflower weld. The material will also not melt together on the inside of the weld, and you’re creating a built-in crack,” says Holman.
If the purge welding process is not followed, the stainless material will only expand and contract so many times before the weld will fail. The purge welding process ensures that the welding rod will flow properly and fuse the material through the tube.
“The beads of the weld on the inside will actually mimic the appearance of the weld on the outside when it’s purge welded,” says Holman.
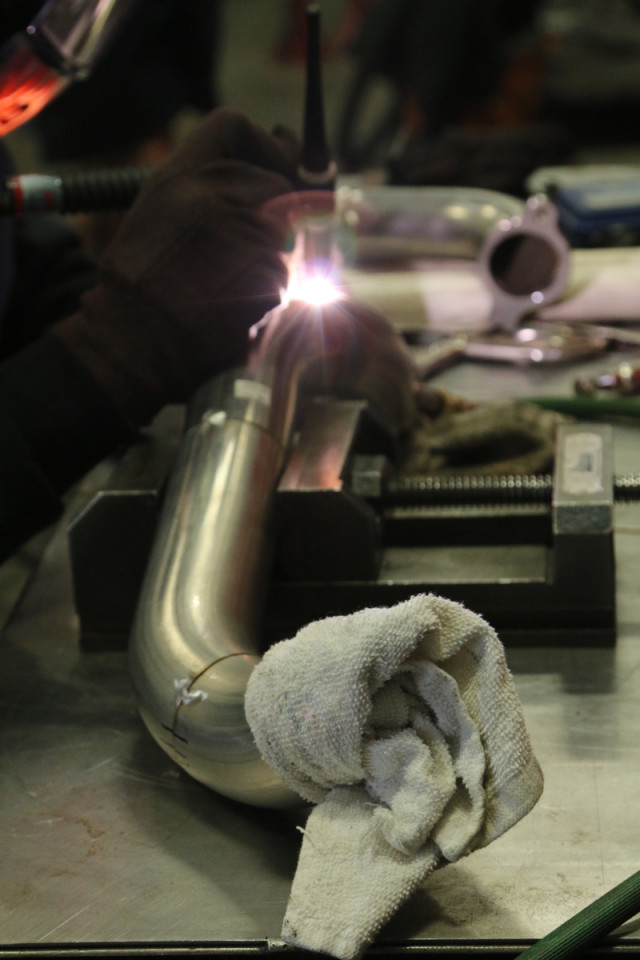
The far end of this header tube has the plug with the argon filler tube; the near end has the rag stuffed inside to keep the argon from leaking out while the welding process is underway.
“Everyone has a different way of doing it. We use a piece of copper tube on a regulator that we stick into one end of the tube, and plug the other end with a cotton glove or rag. We’ll turn the argon gas up to 10-15 inches of pressure to push all of the oxygen out. As you weld the tube, the leaks between material joints are getting sealed as you go. Instead of blowing back out the weld, it will push the gas out through the cotton material and keep the tube full of argon.”
Holman suggests that one of the secrets is to use the smallest diameter welding rod possible. “As long as stainless is melting, it’s hot enough. You never want to use a rod larger than what the gap between materials is; the largest rod we use is .035-inch,” says Holman.
In addition, the type of rod used needs to be a higher grade of stainless than the base material. In this instance the headers were built from 304SS material, so a 308SS rod was used. The higher nickel content in the 308SS rod helps to prevent weld cracking as the header undergoes heat cycling.
“The argon keeps oxygen away from the backside of the weld. On the front side, you have argon flowing from the TIG torch cup to keep oxygen away from the molten metal, which keeps carbides from forming. You need to do the same on the backside of the weld, hence back-purging,”says Roman. Burns also offers their Solarflux powder, which is mixed with alcohol to form a paste that can be brushed on the back side of the weld where possible to form a barrier to keep the weld oxygen-free.
“It may look like diamonds on the outside, but unless you purge weld and use the proper filler material, it’ll fracture,” Holman explains.
In Conclusion
The challenge of fabricating a good set of race headers is a skill that evolves over time, and with careful planning, a solid direction, and the right information at your fingertips, it’s possible for even the garage fabricator to build a set that will perform, look great, and last. The tips presented here are not the be-all end-all of header fabrication; instead, they are some of the things that the experts take into account during the process.
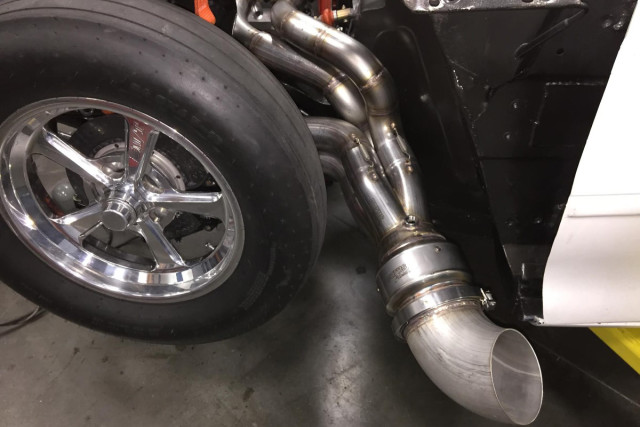
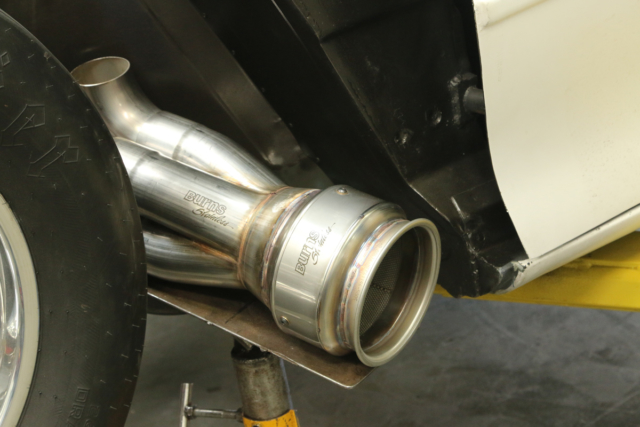
The completed header, five-inch Burns Stainless muffler, and bullhorn constructed as part of this article.


