When modding a car, there are a lot of different variables to take into consideration – supporting mods to go with the part being installed, fitment of the product, materials, price, voiding warranties, etc.
Luckily, Chevrolet Performance Parts has released a slew of 5th generation Camaro parts sourced from the track-focused SS 1LE, the ground-pounding ZL1, and even the new Z/28 that are available to the general public. It’s great because consumers who didn’t purchase a 1LE, ZL1, or Z/28 have the option to install factory performance parts sourced from those two cars on their SS or V6 Camaro – well done, Chevrolet!
With performance parts available directly from the company who puts Camaros on the road in the first place, its not hard to see that Chevrolet is encouraging customers to modify their vehicles. That’s the kind of support that the automotive industry needs – more proven and track tested parts, not accessories, gadgets, and stickers. The best part about the Camaro-specific performance parts is that for certain packages installed by dealership service departments, the factory warranty coverage is retained.
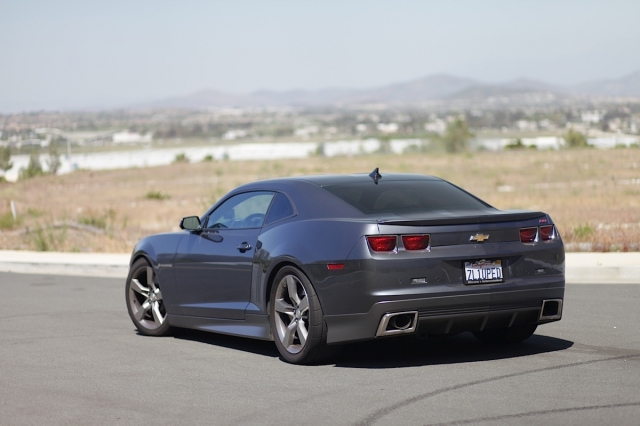 For those that aren’t up to date on all our latest doings, this is our track-focused Camaro SS build. Recently, we installed a full SLP PowerFlo exhaust to help the LS3 in between the strut towers breathe better as well as some sticky Nitto NT555R tires for the track. Now that our 5th Gen is making adequate power, we just need to transfer all of it to the asphalt efficiently with as little wheel spin as possible – that’s why we’ve turned to Chevrolet Performance for their ZL1 HD Driveline upgrade.
The Kit
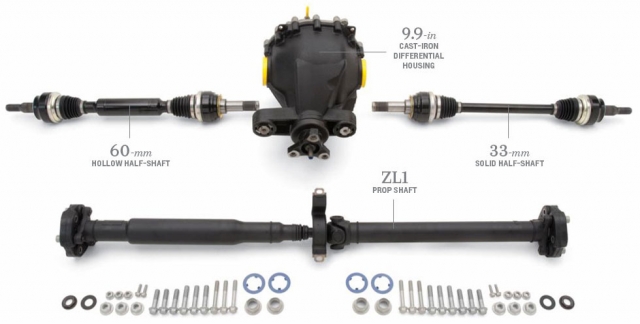
Asymmetrical half-shafts, a two-piece heavy-duty prop shaft, and a 9.9-inch, 14-bolt cast iron differential, along with all of the necessary hardware all come with the kit.
We knew that there was a demand out there for a heavy-duty driveline, especially for the drag racers. – Carl Smith, Chevrolet Performance
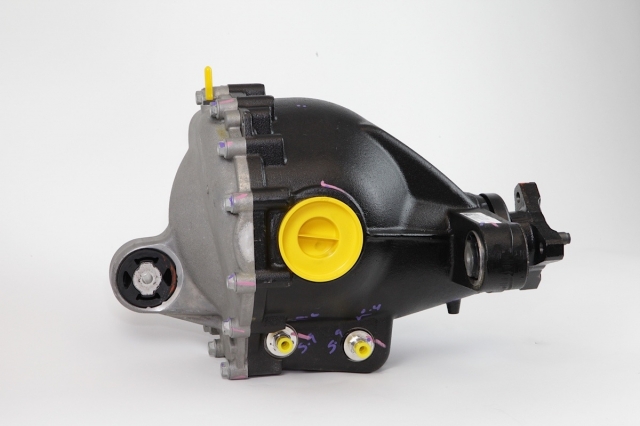
Chevy Performance’s Camaro ZL1 HD Driveline Kit is the strongest independent rear axle option for the Camaro from the factory. Available for both manual (part number 22959394) and automatic transmissions (part number 22959395), the upgrade kit includes a massive cast iron center section that houses the large 9.9-inch limited-slip differential, heavy duty asymmetrical half-shafts, and a stronger driveshaft, or prop-shaft as some may call it.
This kit is the exact same driveline that helps the ZL1 Camaro achieve a four second 0-60 time, sub-12 second quarter mile times, a top speed of 184 MPH, and a 7:41.27 lap time at the Nürburgring. We will be testing all of this over the course of the build, except the Nürburgring lap times and top speed runs, of course – we’ll leave that to the pros!
Built-in Differential Cooler
The ZL1’s factory differential cooler use an internal heat exchanger that works by circulating overcooled transmission fluid to chill the gear oil over 100 degrees. Because the heat exchanger doesn’t intermix the cooling fluid and the gear oil, the differential remains totally sealed
Shafted
“We were looking at features that the drag racers would be looking for,” Chevrolet Performance Engineering Group Manager Carl Smith explained. For example, the half-shafts in the ZL1 HD driveline upgrade are definitely an innovative design and are crucial to putting power down properly. The passenger side half-shaft is a 60mm hollow shaft, while the driver’s side is a 33mm solid shaft – these offer different torsional stiffness rates and work with the limited-slip differential to reduce the chance of wheel-hop on hard launches.
The ZL1 half-shafts are a big step up from our SS’s factory solid half-shafts, which can be a weak link after adding some serious horsepower. We’re installing these half-shafts as a proactive modification because of the power we will be adding in the future – better to be safe than sorry, right?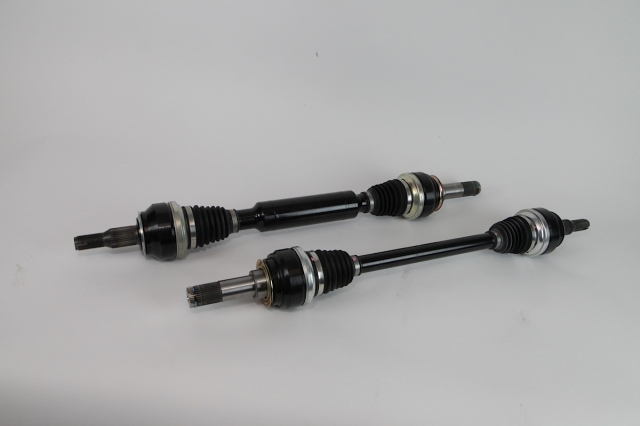
Mad Props
Here, you see the ZL1 driveshaft in its entirety and the heavy-duty companion flange that connects the giubo of the driveshaft to the tailshaft of the transmission.
The prop-shaft included in the ZL1 HD driveline upgrade is pretty beefy, just like the rest of the kit. While it’s not too visible when comparing the two, the ZL1 prop-shaft is a lot stronger than the SS version, having been upgraded to handle the power and torque of the supercharged LSA engine. With the ZL1’s driveshaft designed for higher horsepower applications, it will be perfect for our build with the numbers we’re putting down.
Remove And Replace
When installing the rear driveline upgrade kit, it would be in your best interest to use a vehicle lift, or take it to your local performance shop or dealership to have them install it. Installing this kit with a jack and jack stands is possible, but probably not a lot of fun. The ZL1 differential weighs 144 pounds, and also there’s the fact that you need some space to pull the driveshaft out.
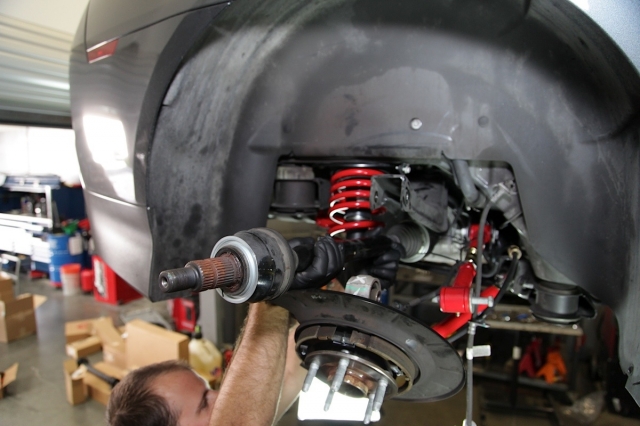 The very first thing we did, besides get the car up on the lift, was take off the rear wheel and tire assemblies to gain access to the rear suspension. The first components to come out were the factory half-shafts – once the wheels were off, we were able to access the axle nut. After removing the axle nuts, we swung the rear hub assemblies down, so we could remove the factory half-shafts. Now, in some of the photos, you might see some components were removed when they didn’t need to be – we were installing some other parts for another story, so don’t be alarmed.
Once the half-shafts were out of the car, we worked on getting the driveshaft out, which is a fairly easy job with some persuasion from a pry bar. To get the driveshaft free, we unbolted the two giubos on each end of the driveshaft – a giubo is used in place of u-joints.
A giubo is a flexible coupler that is used to transmit rotational torque between the driveshaft and the companion flange on mechanical devices – in our case, the driveshaft connects to the transmission and differential via giubo. If you’re wondering why GM uses giubos, it’s because they are made from resonance-damping rubber and are designed to allow slight angular misalignment, while also reducing driveline vibration.
Since these are made of rubber, they should be checked regularly, as they can dry out and crack over extended periods of time. If they’re questionable, save yourself some labor later on down the line and replace them now.
After the giubos are unbolted, the carrier bearing bracket needs to be unbolted as well. For some, the driveshaft might wiggle out with a little finesse, but ours needed to be pried away from the differential companion flange. After some light prying, the driveshaft was finally free from the underside of the car. Next up, differential removal…
Removing the factory differential is the easiest part; it just helps to have either a transmission jack, or two people. There are three bolts that hold the differential in the subframe – one on the differential cover side, and the other two on the driveshaft side. Once the bolts were loosened, the differential came out of the car with ease. Now, we can get to the our favorite part; replacing the factory components with better factory components!
On the left, you can see the factory 3-bolt companion flange - the ZL1 companion flange installs the same exact way as the factory flange, except it is much stronger to handle the power. To the right, Cody positions the driveshaft for installation.
“Reassemble in Reverse Order of Disassembly”
The first component to go back in was the beefed-up ZL1 driveshaft. The kit also came with a heavy-duty companion flange that is a lot stronger than our SS’s factory flange – that flange installs on the tailshaft of the transmission, and connects it to the driveshaft
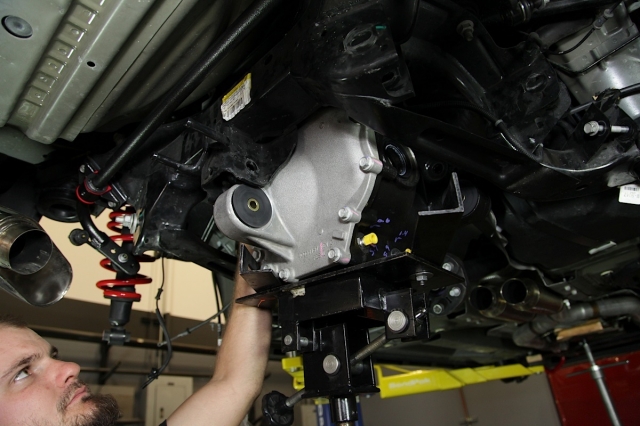
In this photo, Dean is using a transmission jack to hoist the 144-pound ZL1 differential into its new home.
With the driveshaft and new companion flange installed, we hoisted the 14-bolt, cast iron housing, 9.9-inch ZL1 differential up into the rear subframe via transmission jack. The stock SS rearend holds 3.45/1 ratio gears in manual transmission cars like our Camaro, or 3.27/1 gears for the automatic. Ordering up the ZL1 driveline kit gets you 3.73’s for the stick shift version, or 3.23 cogs for the automatic.
The lower (numerically larger) gearing will help improve off-the-line performance, but be aware that it will change your speedometer and odometer readings. Fortunately, every flash tuner we have ever come across has an easy way to reprogram the ECU to correct for different gears, so it’s not a major issue if you have one, or have access to a professional tuner.
Once the differential was positioned correctly, we slid the bolts through the mounting holes and secured it into its new home. The differential does have a built-in differential cooler, but we left the plugs in with plans to plumb an auxiliary heat exchanger unit later on in the build.
The factory cooler setup circulates overcooled transmission fluid through an internal heat exchanger built into the differential, but we will be using a separate cooling loop, pump, and oil cooler to achieve the same thing. For now, keeping it plugged won’t hurt anything – we just won’t have the added benefit of precisely-controlled gear oil temperatures.
From left to right: Dean lining up the splines on the half-shaft to the splines in the differential and engages the spring clips to lock it into the differential.
Now we’re on the home stretch and can finally install the ZL1 half-shafts into the heavy-duty differential. Possibly the easiest task out of the whole install, all there is to do is slide the half-shafts into the differential with the splines lined up, then push them in until there is a pop – that means the spring clips are engaged.
Once the spring clips were engaged on both sides, we could finally start buttoning the car up. With the hubs still connected to the control arms, we swung the assemblies up and threaded on the axle nuts to complete the install. After everything was all said and done, we checked every nut and bolt that we touched to make sure everything was nice and secure.
In Retrospect
Overall, this install was a breeze, and it really helped to have the right tools at hand for a job like this. This kit is fantastic, and we feel a lot better about having components on the car that can handle the power it’s putting to the tires.
For the money, the kit is a great way to upgrade a V6 or SS Camaro’s driveline to handle gobs of more power, using all factory parts that are engineered for this platform. For more Camaro-specific performance parts, head on over to Chevrolet Performance’s website and check out all of the goodies that are available to help your Camaro perform like track star it was meant to be.


