When it comes to planning out an engine build, one of the most important specifications in the long list of measurements, is the volume of your cylinder head’s combustion chambers. After your bore and stroke, combustion chamber size is the next largest factor in your engine’s compression ratio. Besides just housing your intake and exhaust valves, the combustion chamber shape and size can really increase the efficiency of your engine.
With all the development in the shape of the combustion chamber, they have become a highly irregular shape, which makes them incredibly difficult to measure the volume of through traditional means. Sure, if you have access to the CAD file for the porting program you could see the volume of the chamber pretty accurately, but the second you leave the digital realm and get into the real world, chances are that volume will stray from ideal.
If you were to touch up the chamber by hand, deck the heads, or even change valves, you need a way to check the new volume of the chamber so that you can accurately calculate your engine’s compression ratio. What about with a second-hand set of heads? You might know what the manufacturer’s specs were originally, but a lot of things can change between the manufacturer delivering a part to the original owner, and when it finally ends up in your hands.
In the case of scrapyard heads, you might not know what they were even supposed to be from the factory, let alone what happened to them before they found their way to the junkyard. So checking the combustion chamber volume is an absolutely necessary step in order to properly plan your engine build.
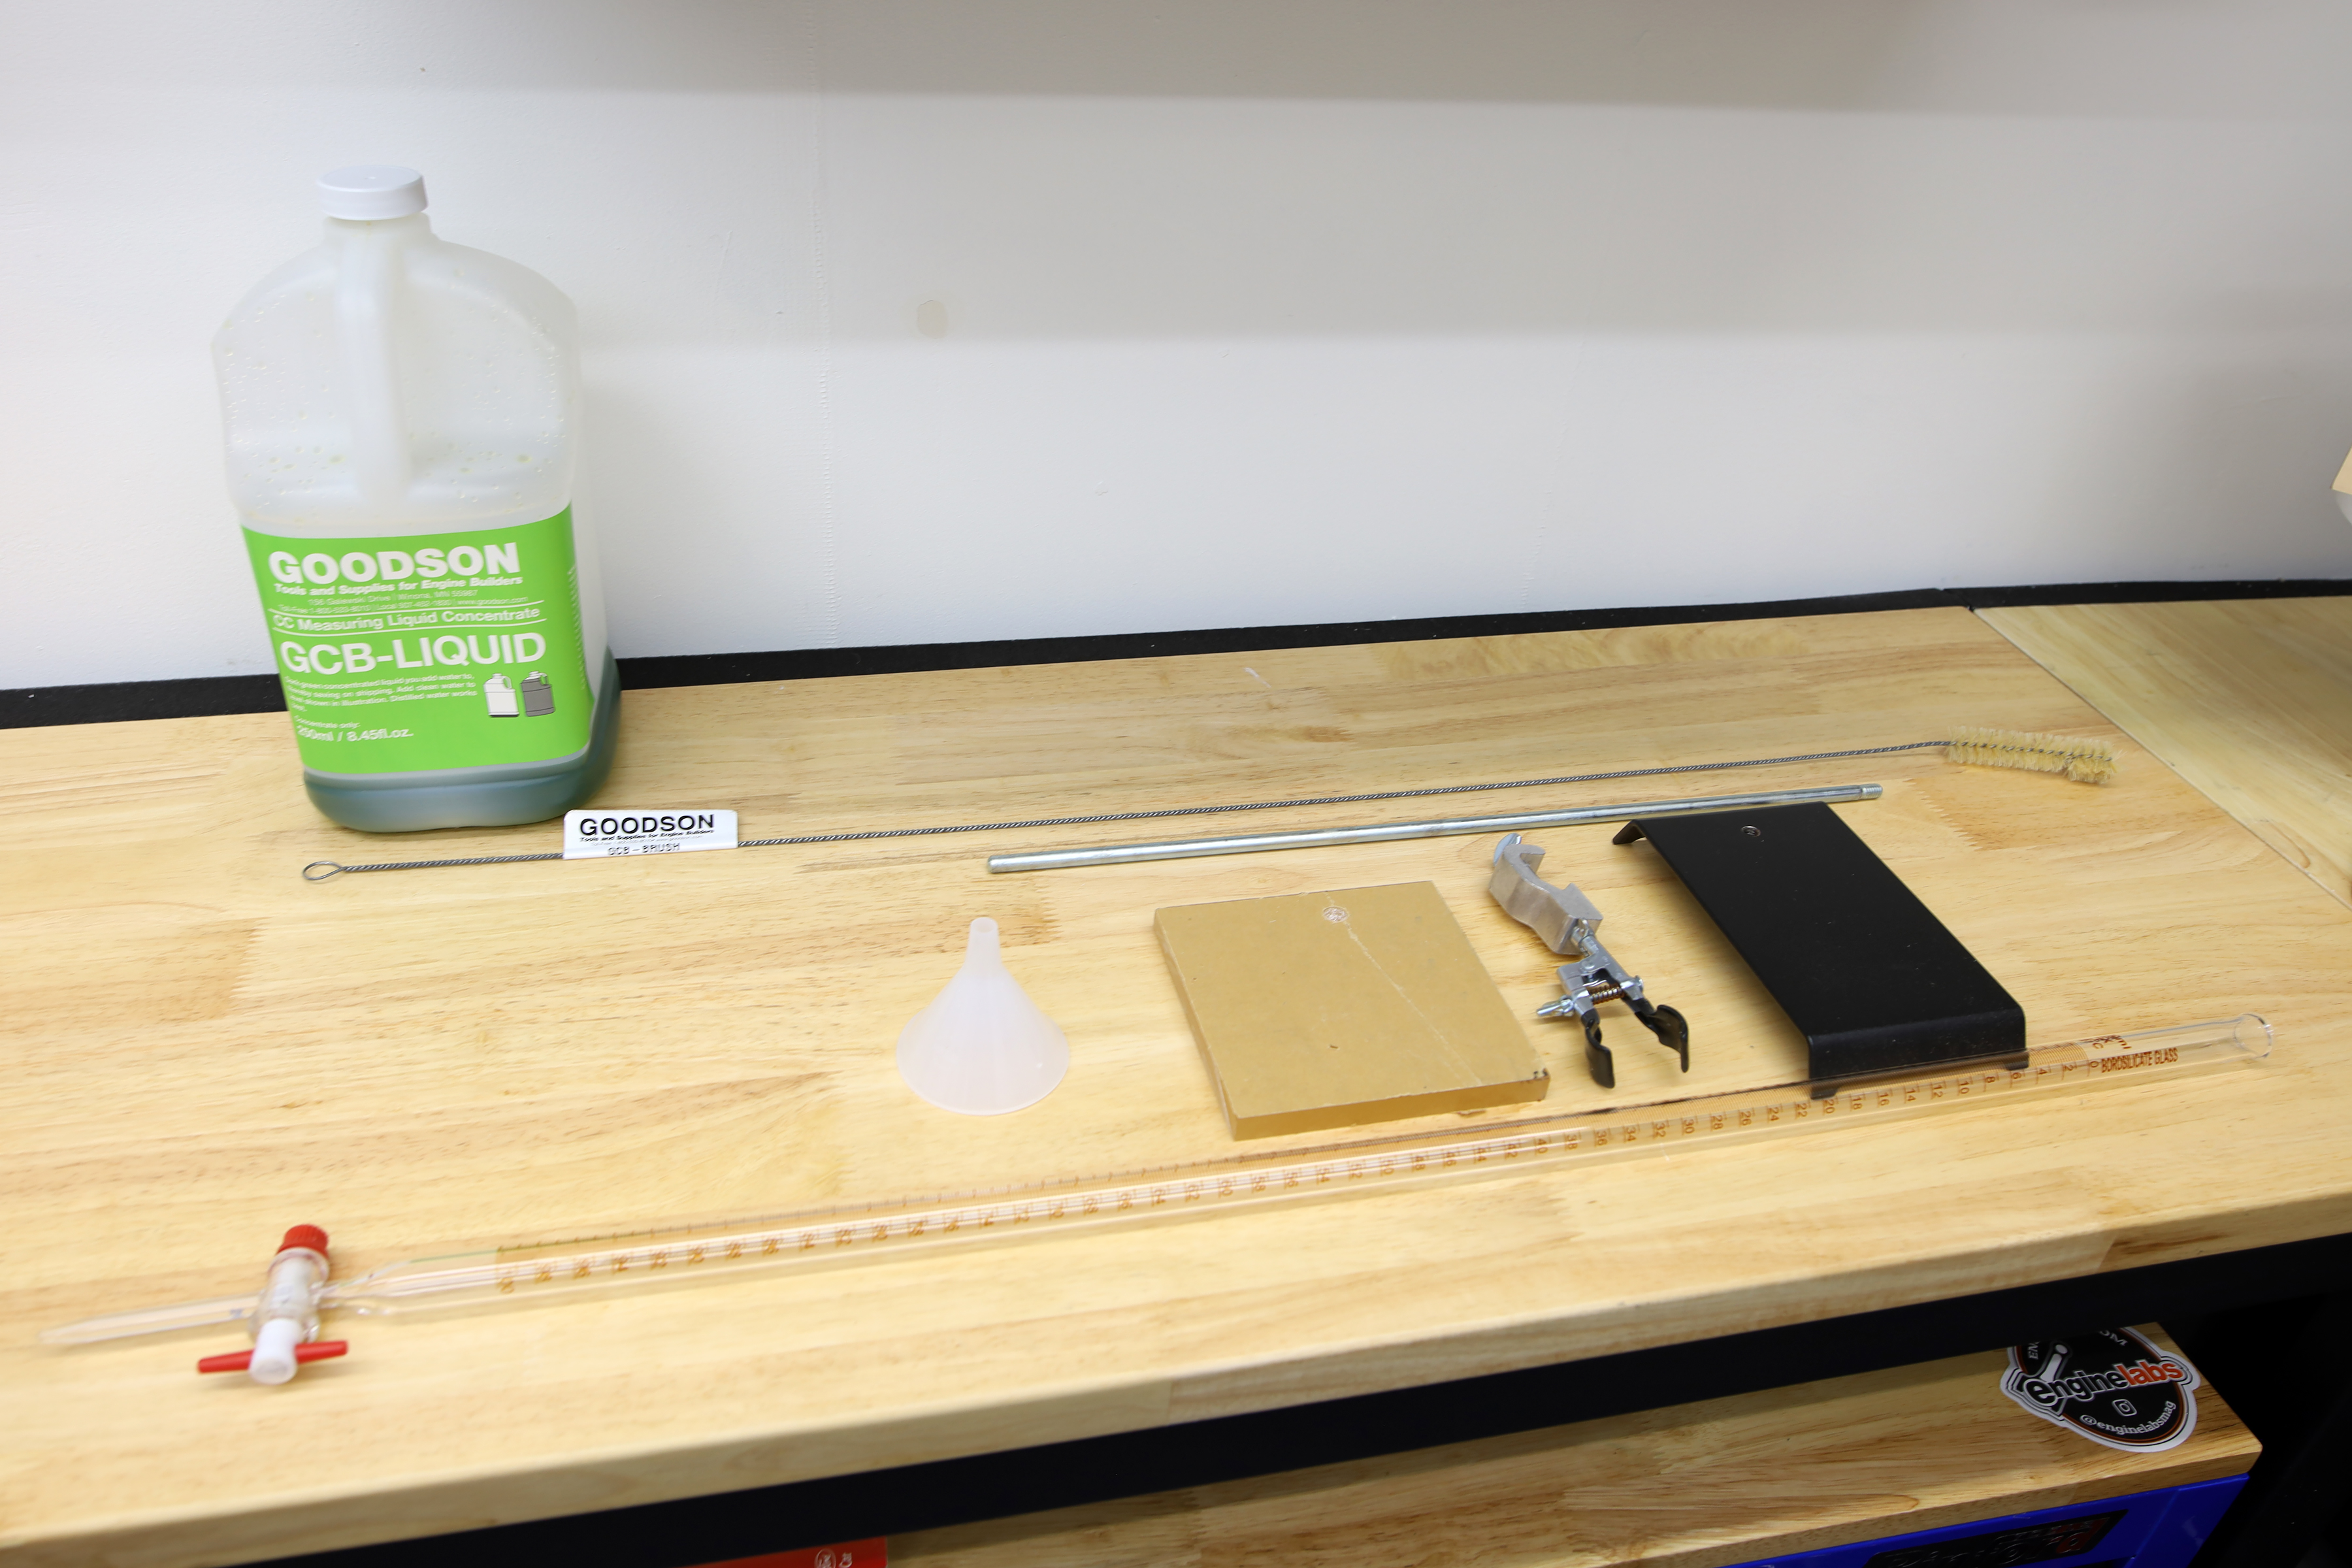
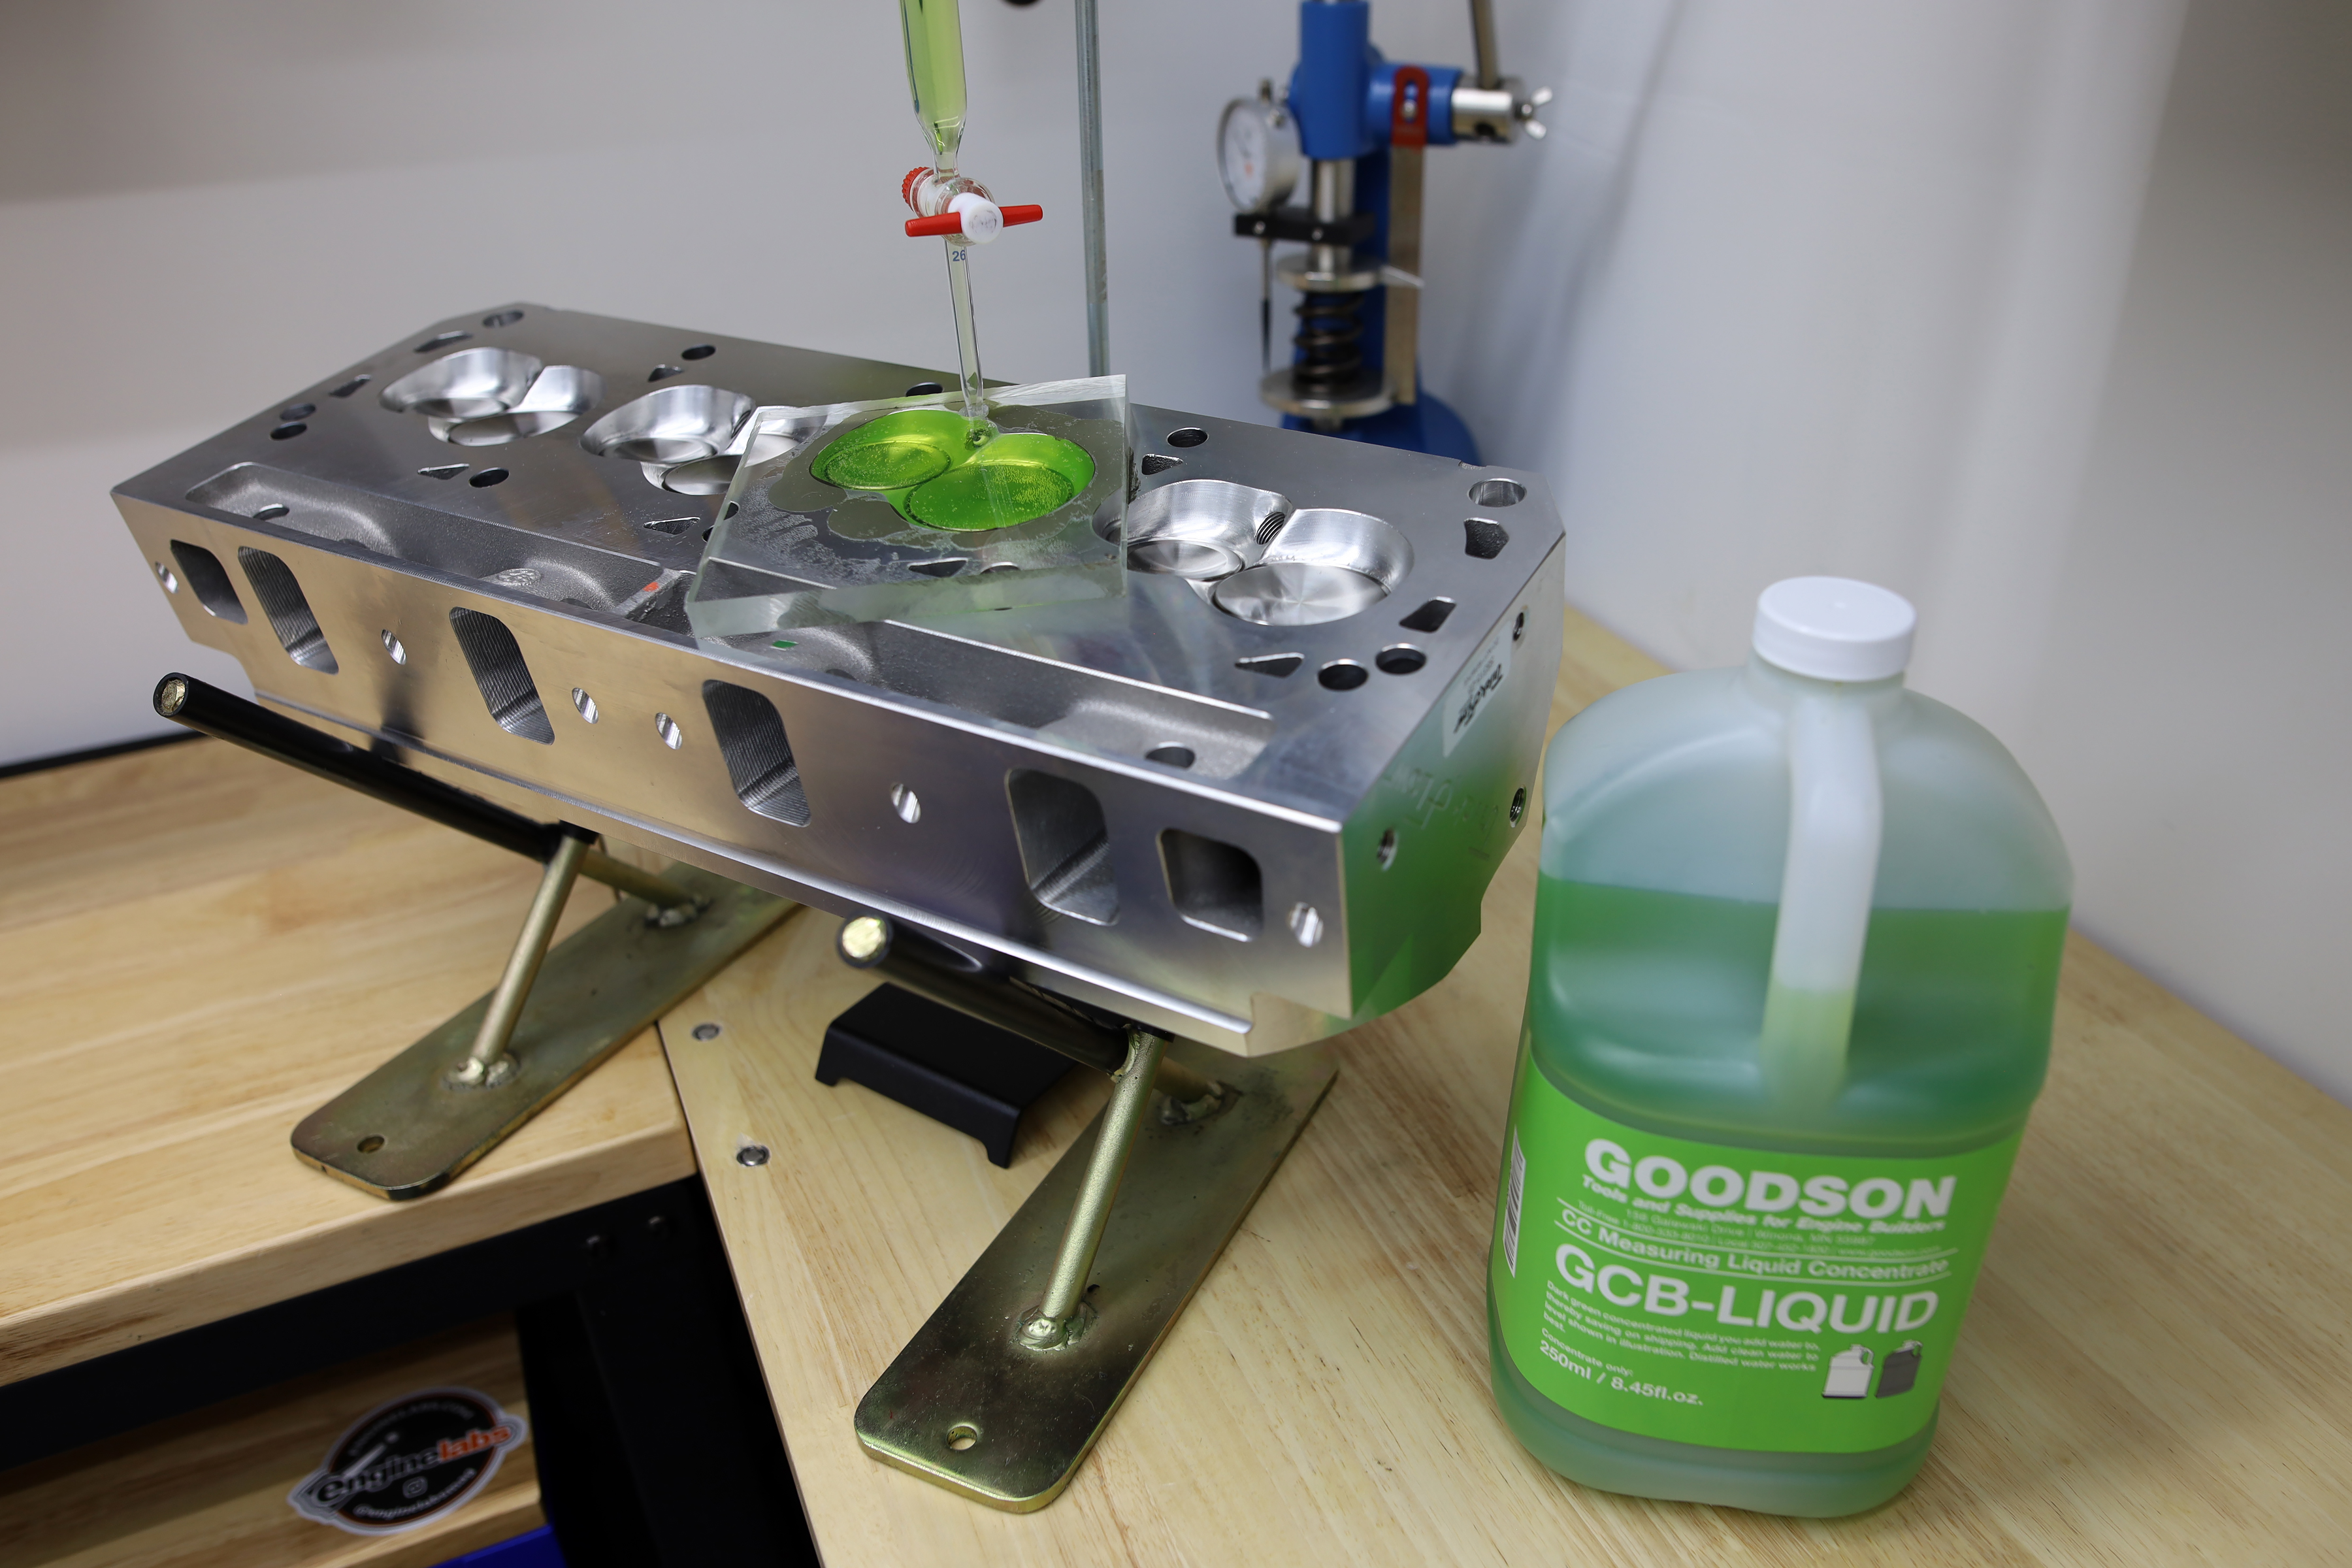
This kit from Goodson Tool and Supply includes everything you need to check your combustion chamber volume. A 100cc burette, a funnel, a burette stand, a sealing plate, and a cleaning brush.
How To Measure An Irregular Shape
In order to measure an irregular shape, we have to go back more than 2,200 years, to the days of the mathematician Archimedes. While he is credited with discovering a large number of principles we still use today, the one that applies here is the principle of displacement. That states that an object’s volume can be measured by the amount of water displaced when submerged.
Conversely, we can extrapolate that by measuring how much water it takes to completely fill a void, we can know the volume of that void. In our case, that void is the combustion chamber, in an otherwise flat cylinder head deck. So, by measuring the amount of water it takes to fill our combustion chamber, we know its volume; simple.
However, in order to do this accurately, we need some specialty equipment. We need a way to seal the chamber while still allowing us to fill it. We need a way to accurately measure the amount of fluid we’re pouring into the sealed chamber, and we need a fluid to fill the chamber with. There are several ways to skin each of those cats, but we opted to go with an all-in-one kit from Goodson Tool and Supply.
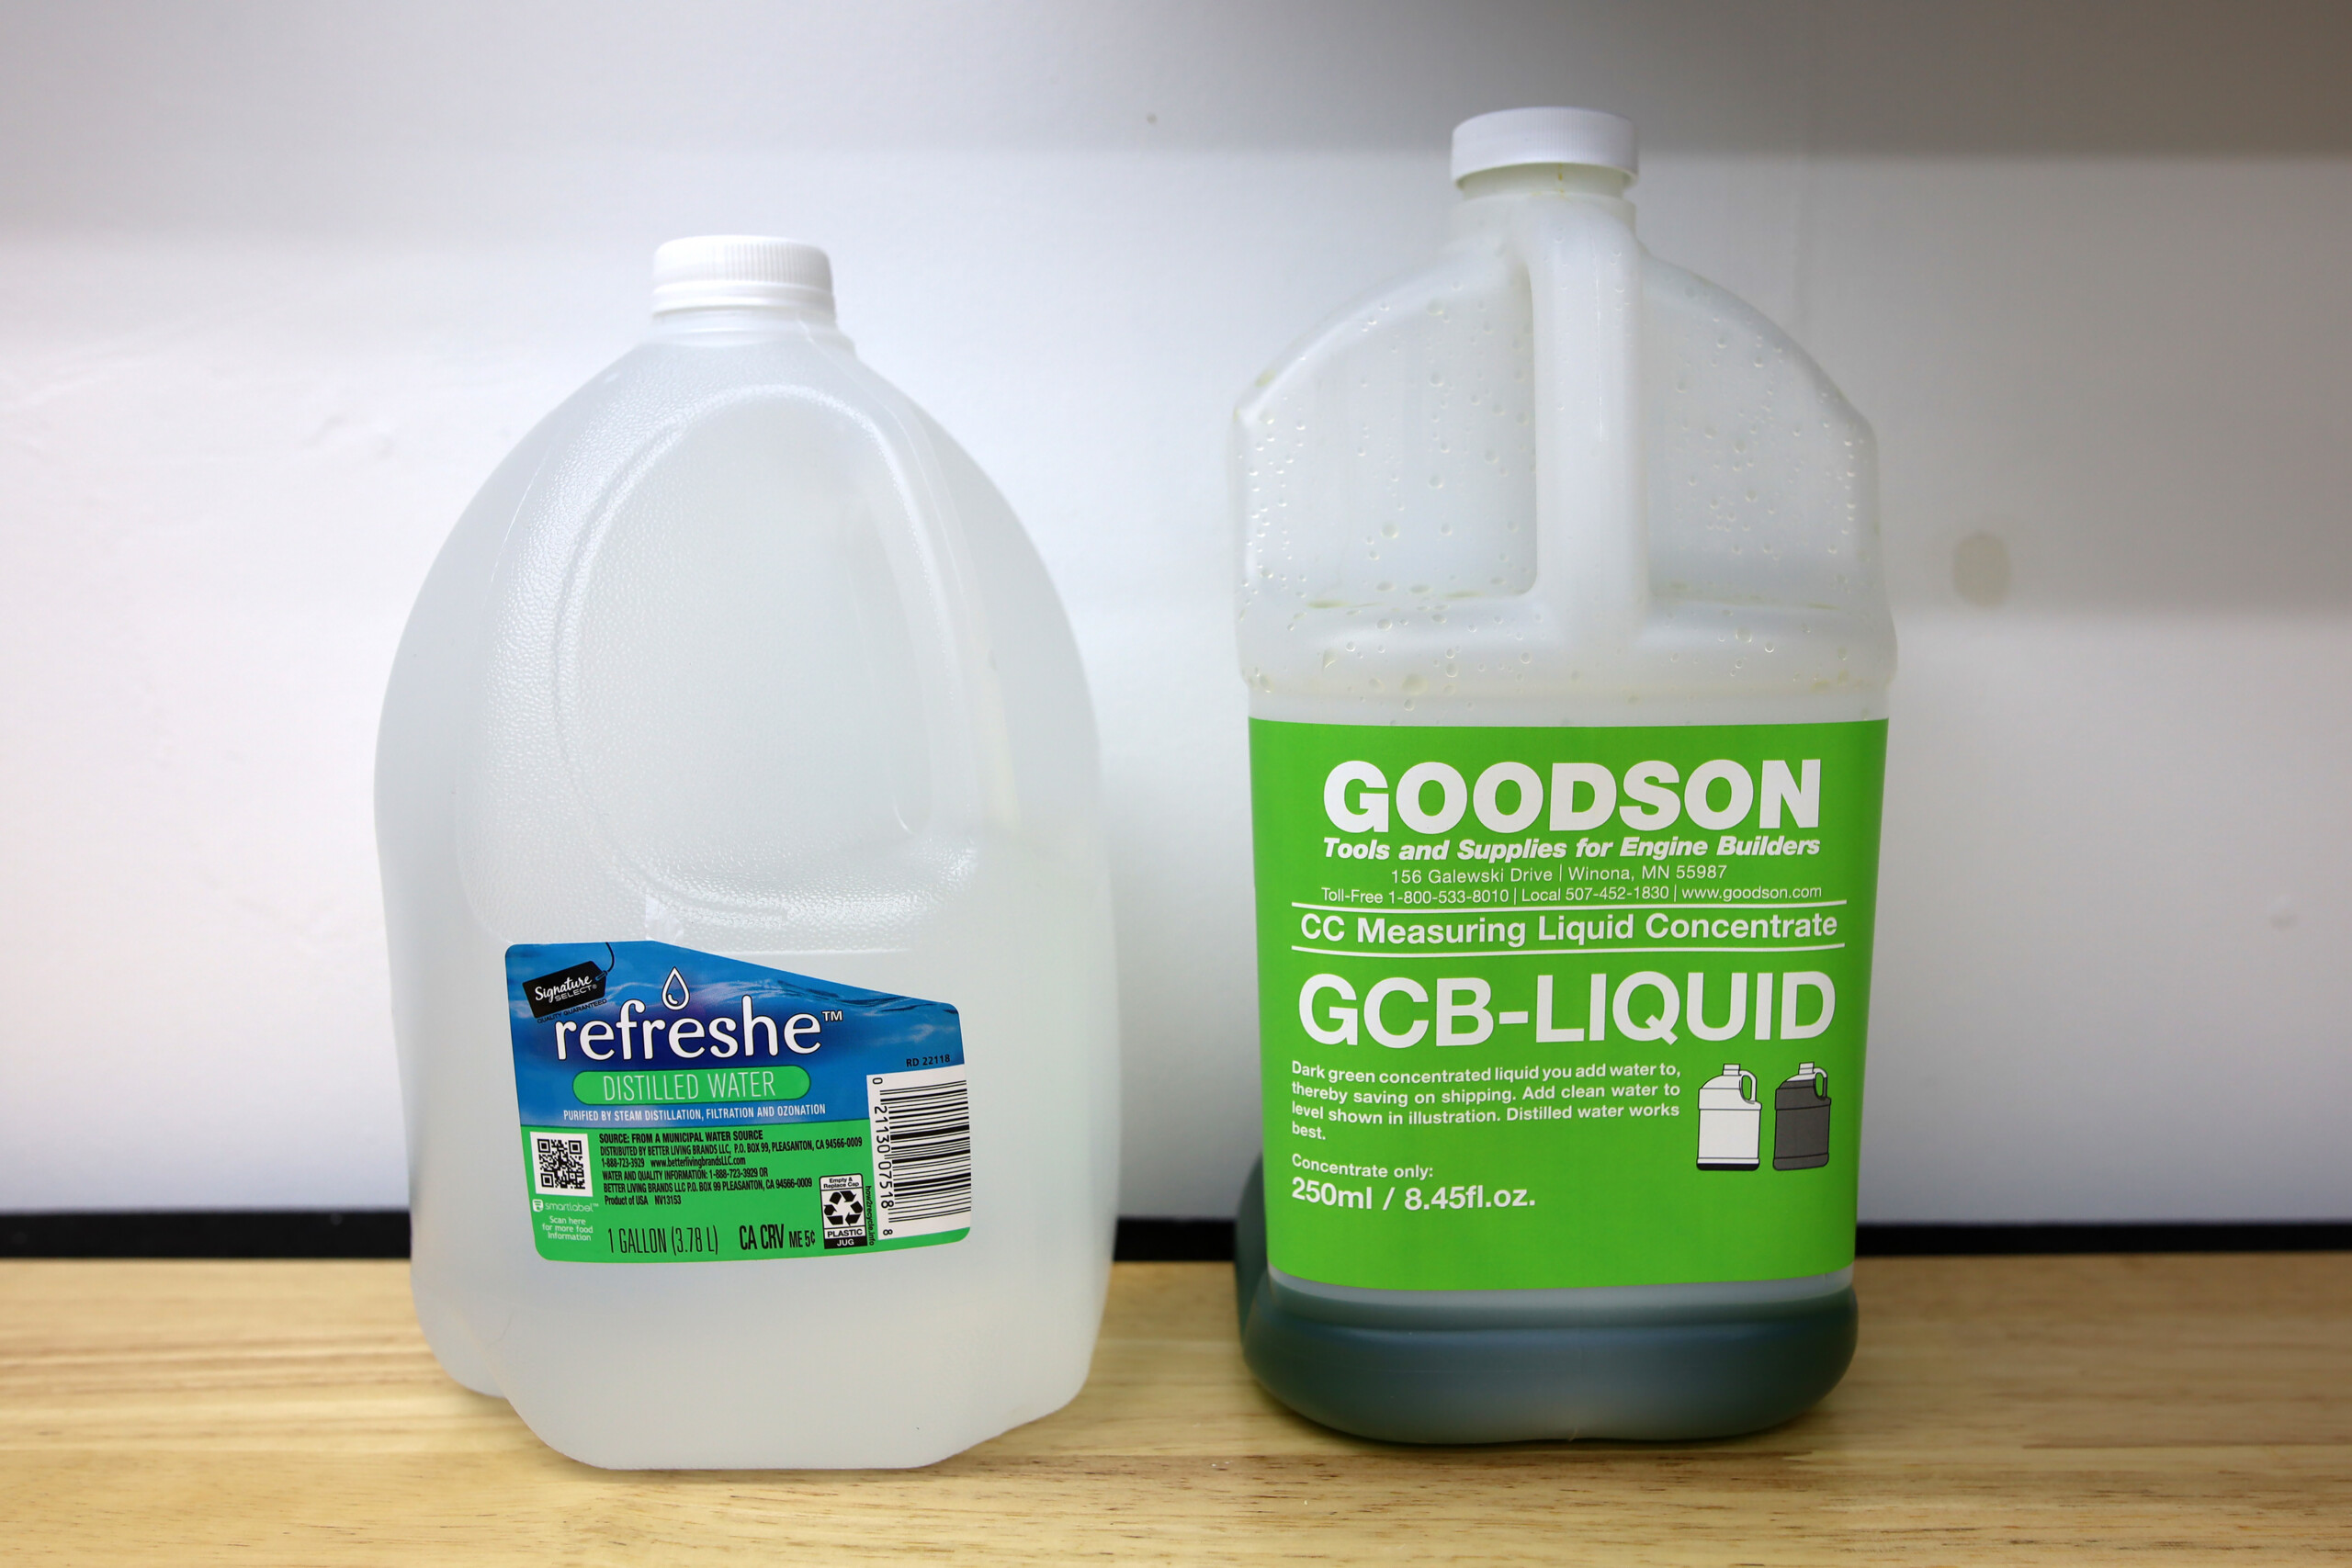
The Goodson measuring fluid comes as a concentrate to save on shipping costs. You just add distilled water up to the shoulder and you have a gallon of neon green fluid. Quick math says a gallon of fluid will net you about 37 burettes full of fluid.
The Goodson Deluxe CC Measuring Kit (P/N: CCB-KIT) includes all the tools you’ll need to measure your cylinder head’s combustion chambers down to the tenth of a cubic centimeter (0.1cc). The first is a laboratory-grade glass burette. Made from borosilicate glass (a.k.a. Pyrex), the burette is reverse-marked from 0cc to 100cc to tell you how much fluid has been released, as opposed to how much fluid remains.
The burette’s markings are in 0.2cc hash marks (allowing you to accurately resolve to 0.1cc by splitting the two lines) in easy-to-read high-contrast ink. The petcock is a ground-glass valve which allows for precise control of the fluid from wide open to rapidly fill large chambers, to slow drops, allowing you to accurately get those final tenths of a milliliter into the chamber for an accurate measurement.
FUN FACT: 1 mL = 1 cc
One of the reasons all of the math works out so simply, is because one milliliter (mL) of water takes up one cubic centimeter (cc) of volume. Additionally, the average drop of water contains 0.05mL of water, meaning that it takes 20 drops of water from the burette to make up 1cc of displacement.
Sealing The Chamber
In order to keep the fluid in the chamber you need some form of sealing plate. The Goodson kit comes with one of the sturdiest sealing plates we’ve come across, in the form of a five-inch square piece of 3/8-inch-thick acrylic. The acrylic allows you to see into the chamber as you fill it, in order to ensure you are completely full with no bubbles. The extra thickness ensures the plate remains completely flat when sealed to the chamber.
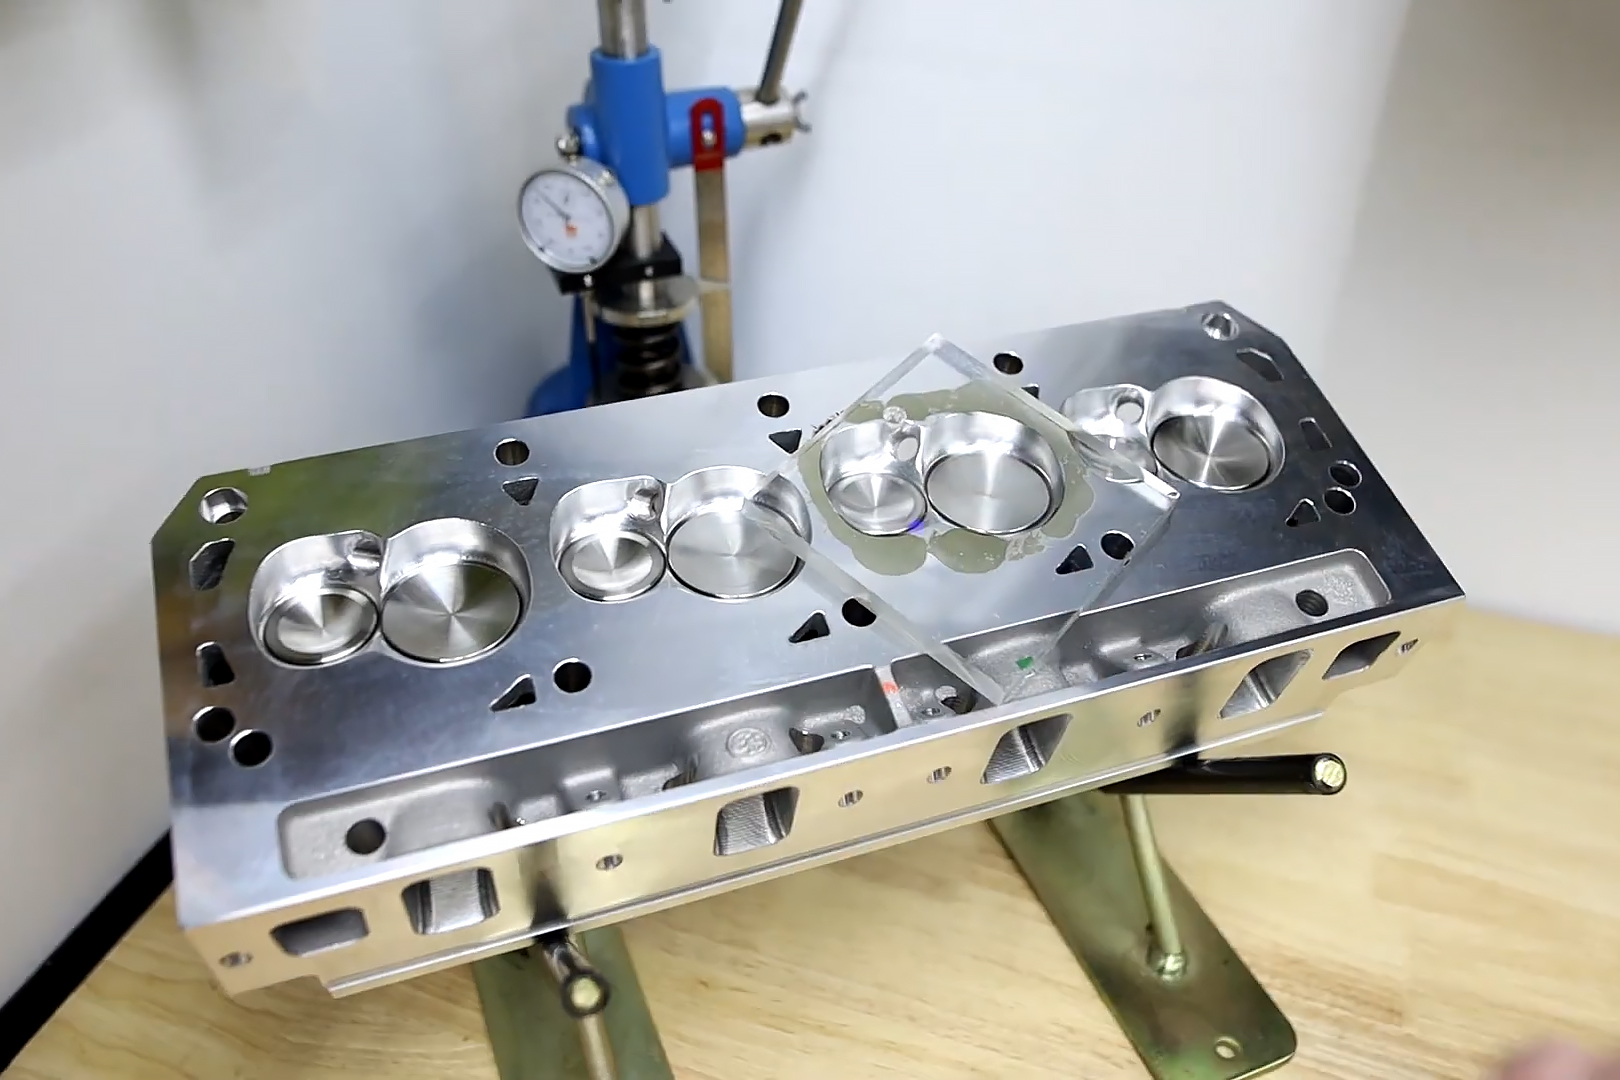
The thin layer of grease around the chamber will spread out under pressure and form a liquid-tight seal. Note the position of the fill hole at the top of the chamber.
To seal the plate to the chamber, a very light film of grease is applied around the chamber and the plate is pressed onto the deck of the cylinder head. The grease will expand and form a liquid-tight seal to retain the measuring fluid. In the plate is a fill hole, which Goodson has drilled conically, to help funnel the fluid into the combustion chamber. This fill hole should be placed at the highest point of the sealed chamber, as it sits on the bench.
The last step to sealing your chamber is an easy step to forget… You need to put a spark plug in the spark plug hole, with enough torque that it actually seals. You’ll want to use the correct plug for your application, because thread reach and electrode length can have an effect on the overall volume. But, be aware that you probably won’t want to use the plug after this, since water can play hell on your plugs. Sure, you can probably dry it out and reuse it, but best to use a single plug for checking combustion chambers and keeping it out of the rotation.
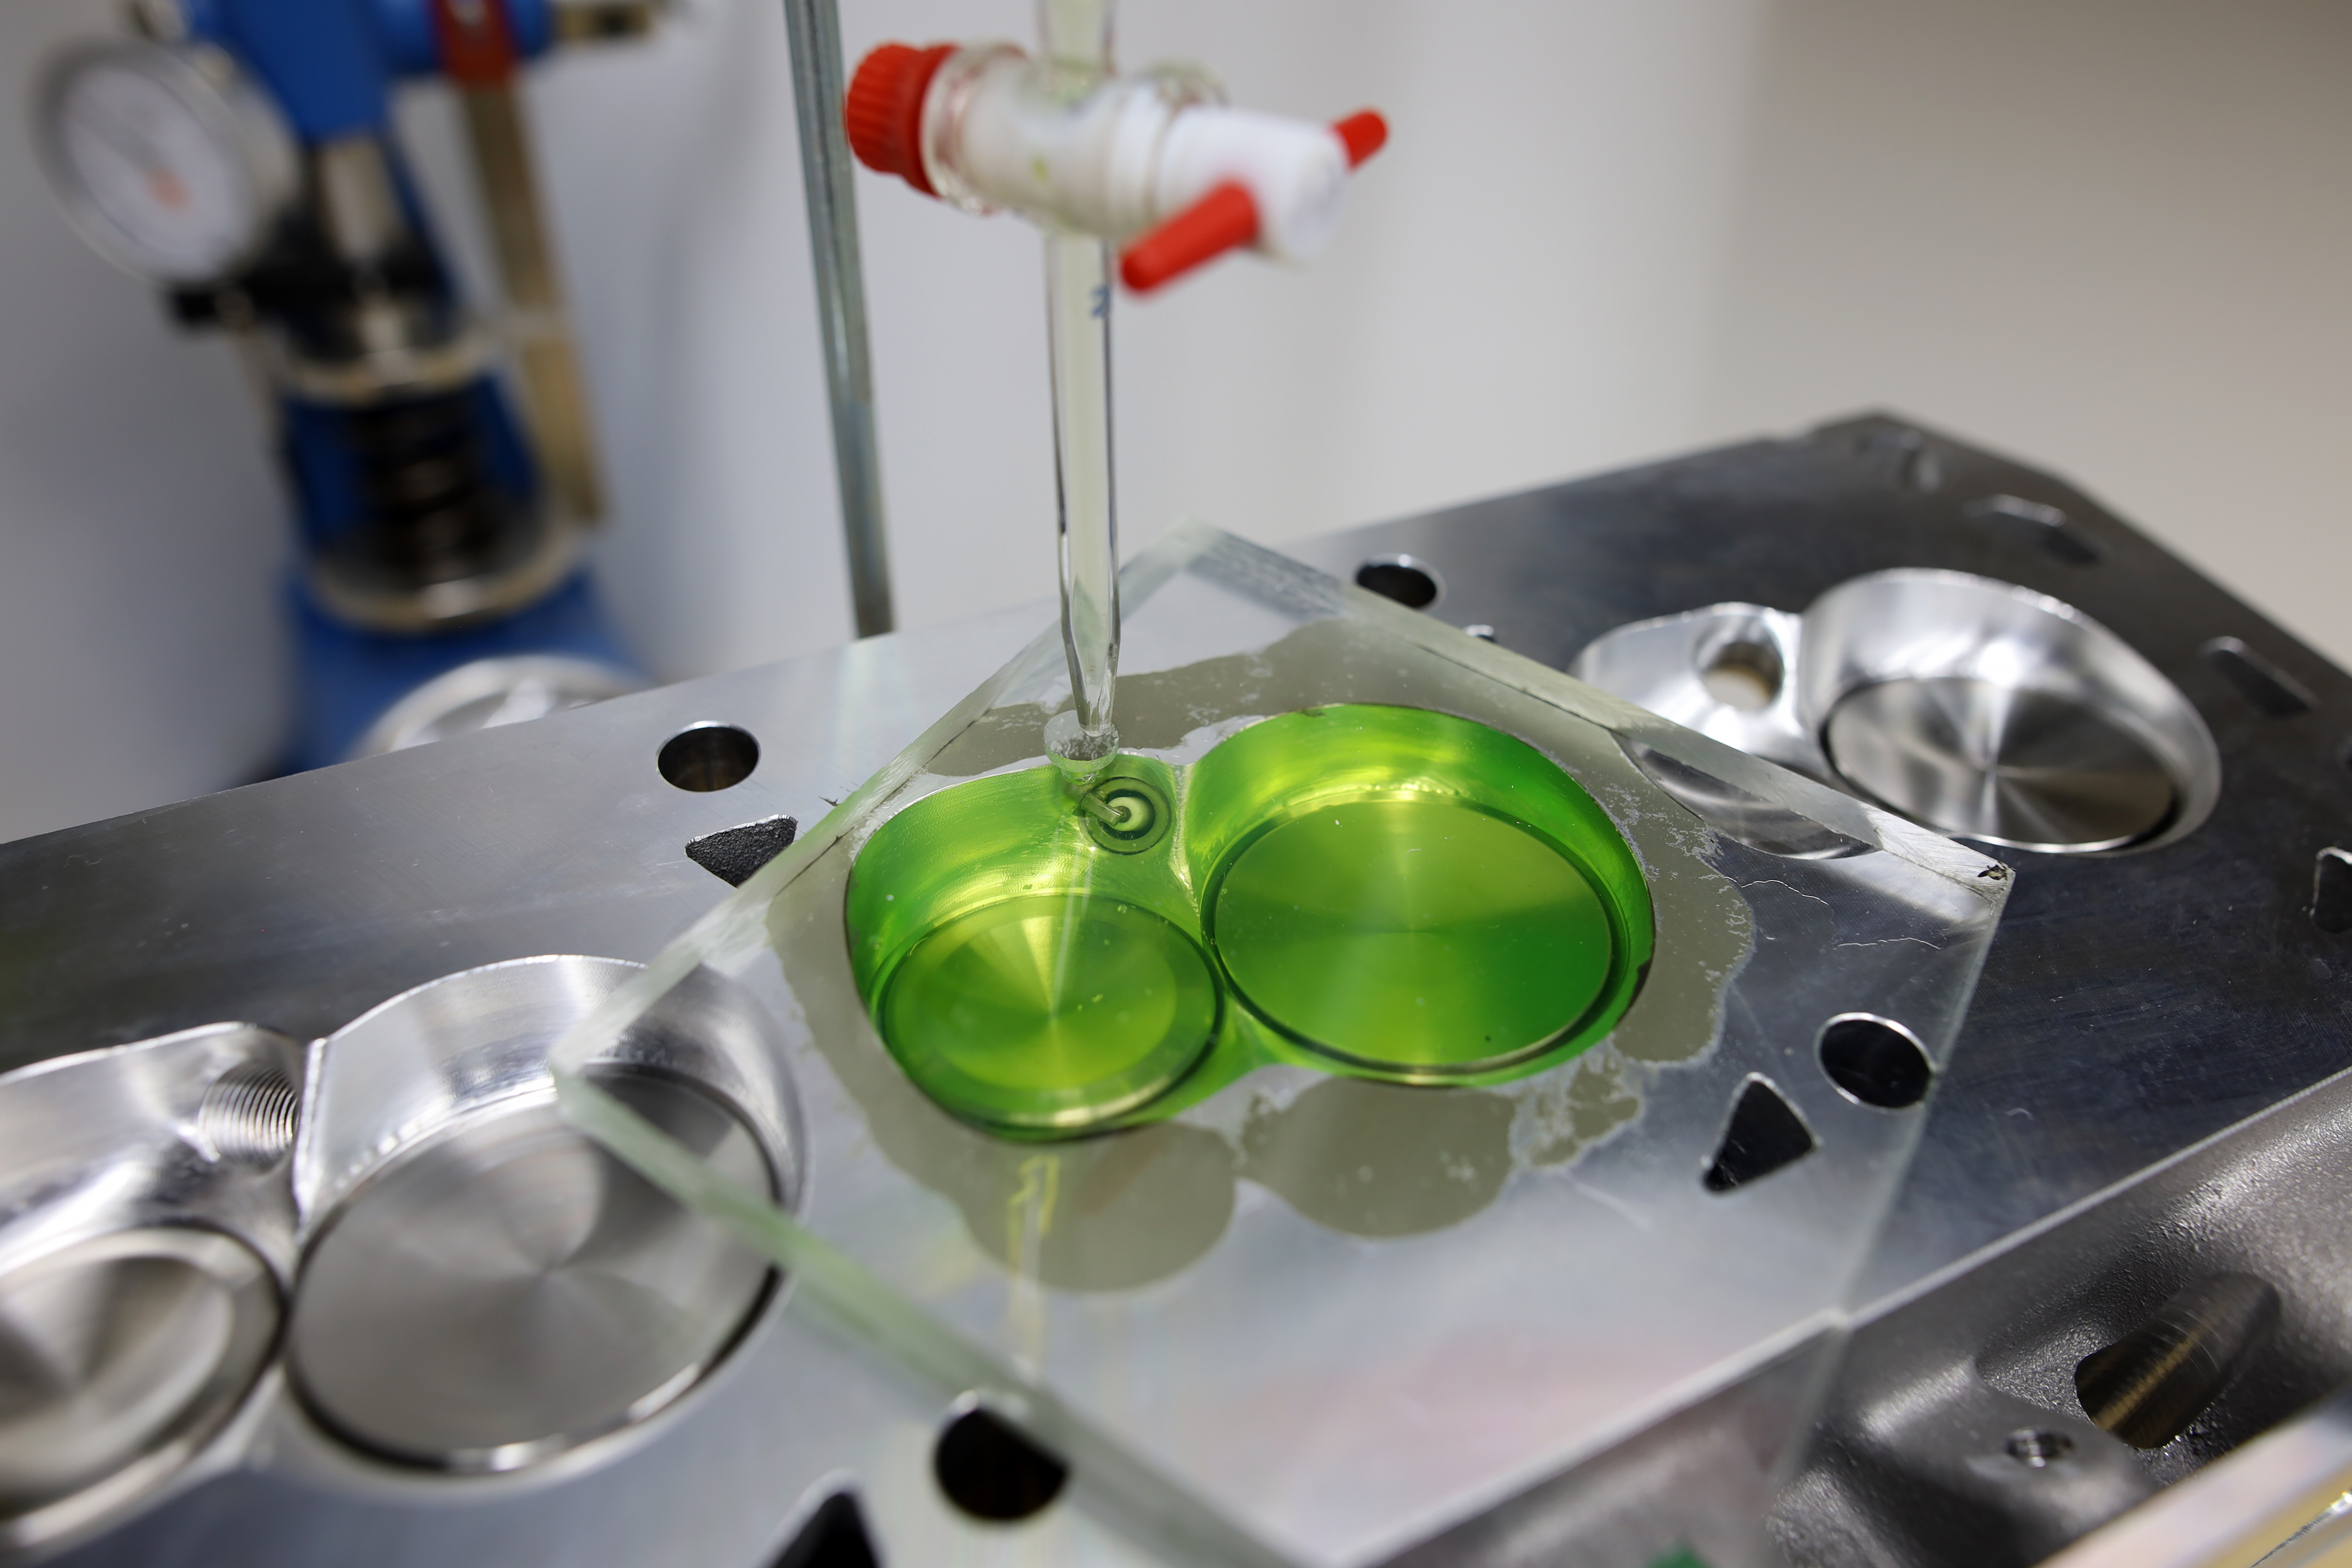
This is what a full combustion chamber looks like. No air bubbles in the chamber, and fluid right up to the plate opening. The colored liquid makes this a lot easier to see.
Setting It All Up
While you could probably hold the burette by hand and fill the chamber if you absolutely had to, luckily, you don’t. Goodson makes it easier, by including a scientific-industry-standard burette stand. This consists of a heavy metal baseplate with a rod that threads into it. Then, a burette clamp affixes to the rod, and gently but securely holds the glass burette over the fill port in the acrylic plate.
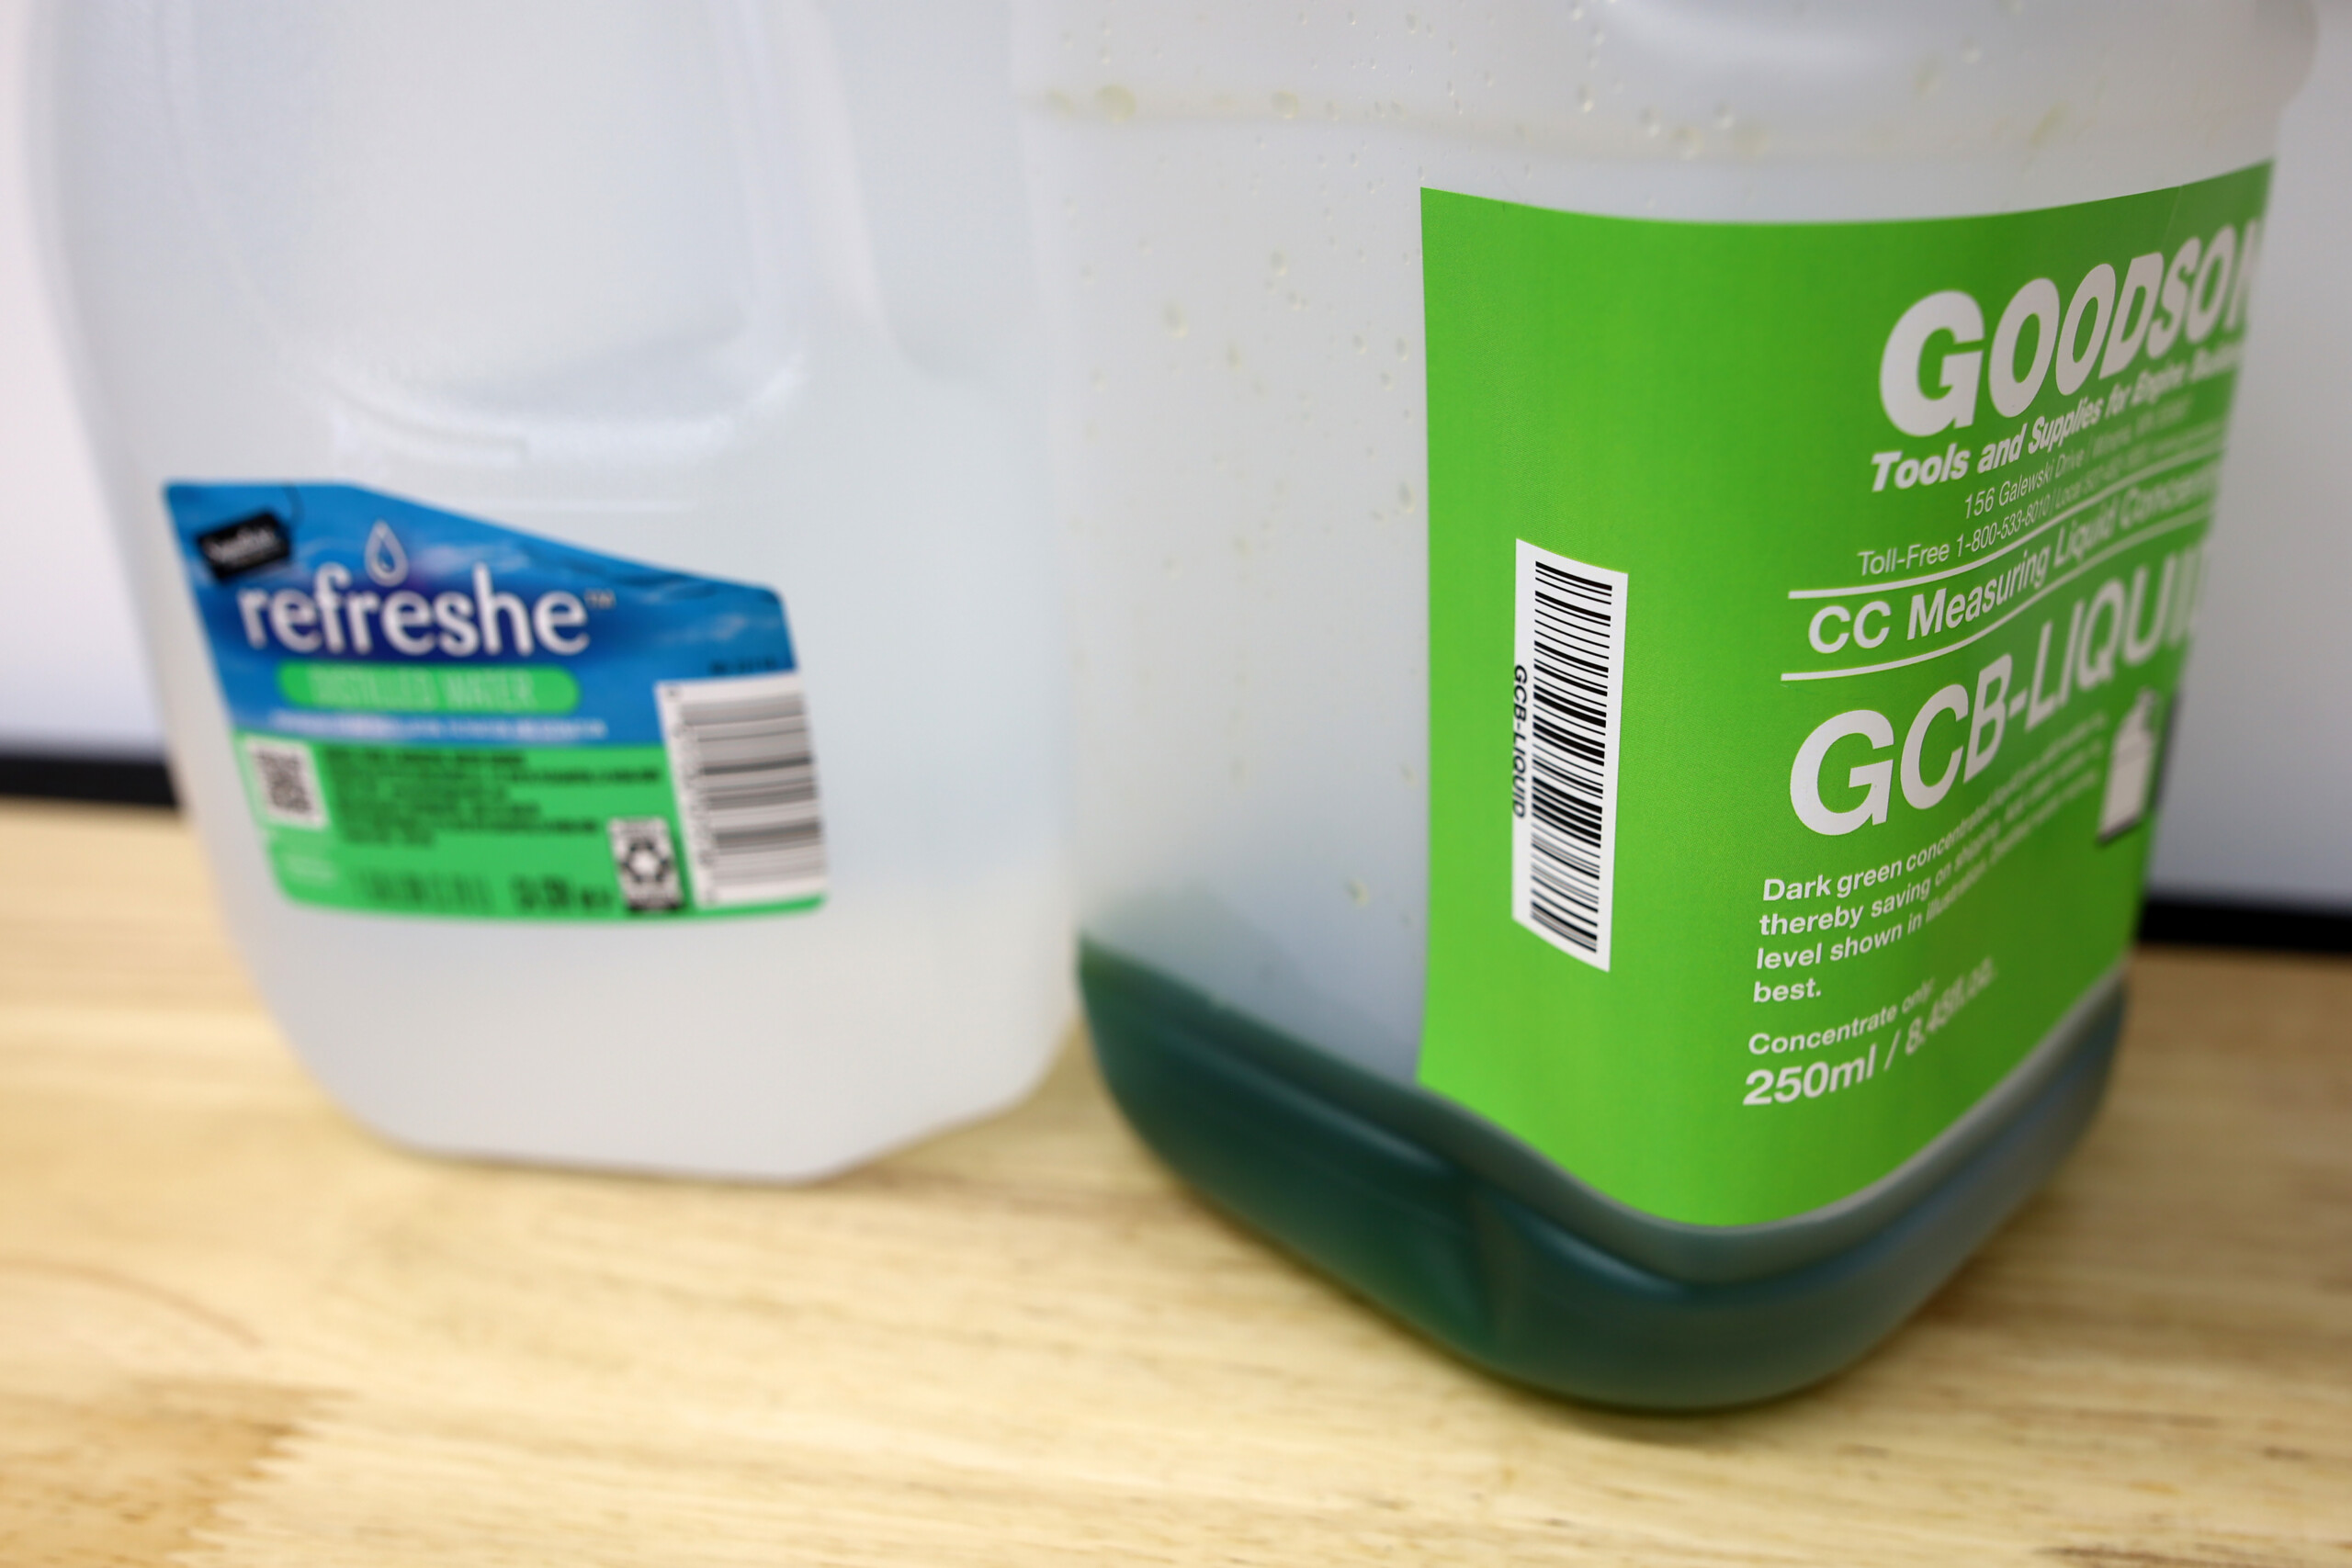
From there, you need to fill the burette with your measuring fluid. Goodson offers an easy solution to that, in their CC Measuring Liquid Concentrate (P/N: GCB-LIQUID). It comes in a one-gallon bottle that is barely filled, so as to save weight and the associated shipping costs. You simply add in some distilled water, shake it up, and you have a high-visibility neon green fluid that makes you feel a little like a mad scientist.
Now, filling the burette is where attention to detail starts to come into play. The best course of action is to fill the burette using the included funnel to just over the 100cc mark at the top of the scale. Then, bleed your fluid level down to exactly 100cc. While the scientifically correct way to read the level of the burette is to be at eye level with the fluid level, and read the bottom of the meniscus (the bottom of the curved surface of the liquid in the cylinder), as long as you read the meniscus exactly the same way on the initial calibration and final reading, you’ll be on the money.
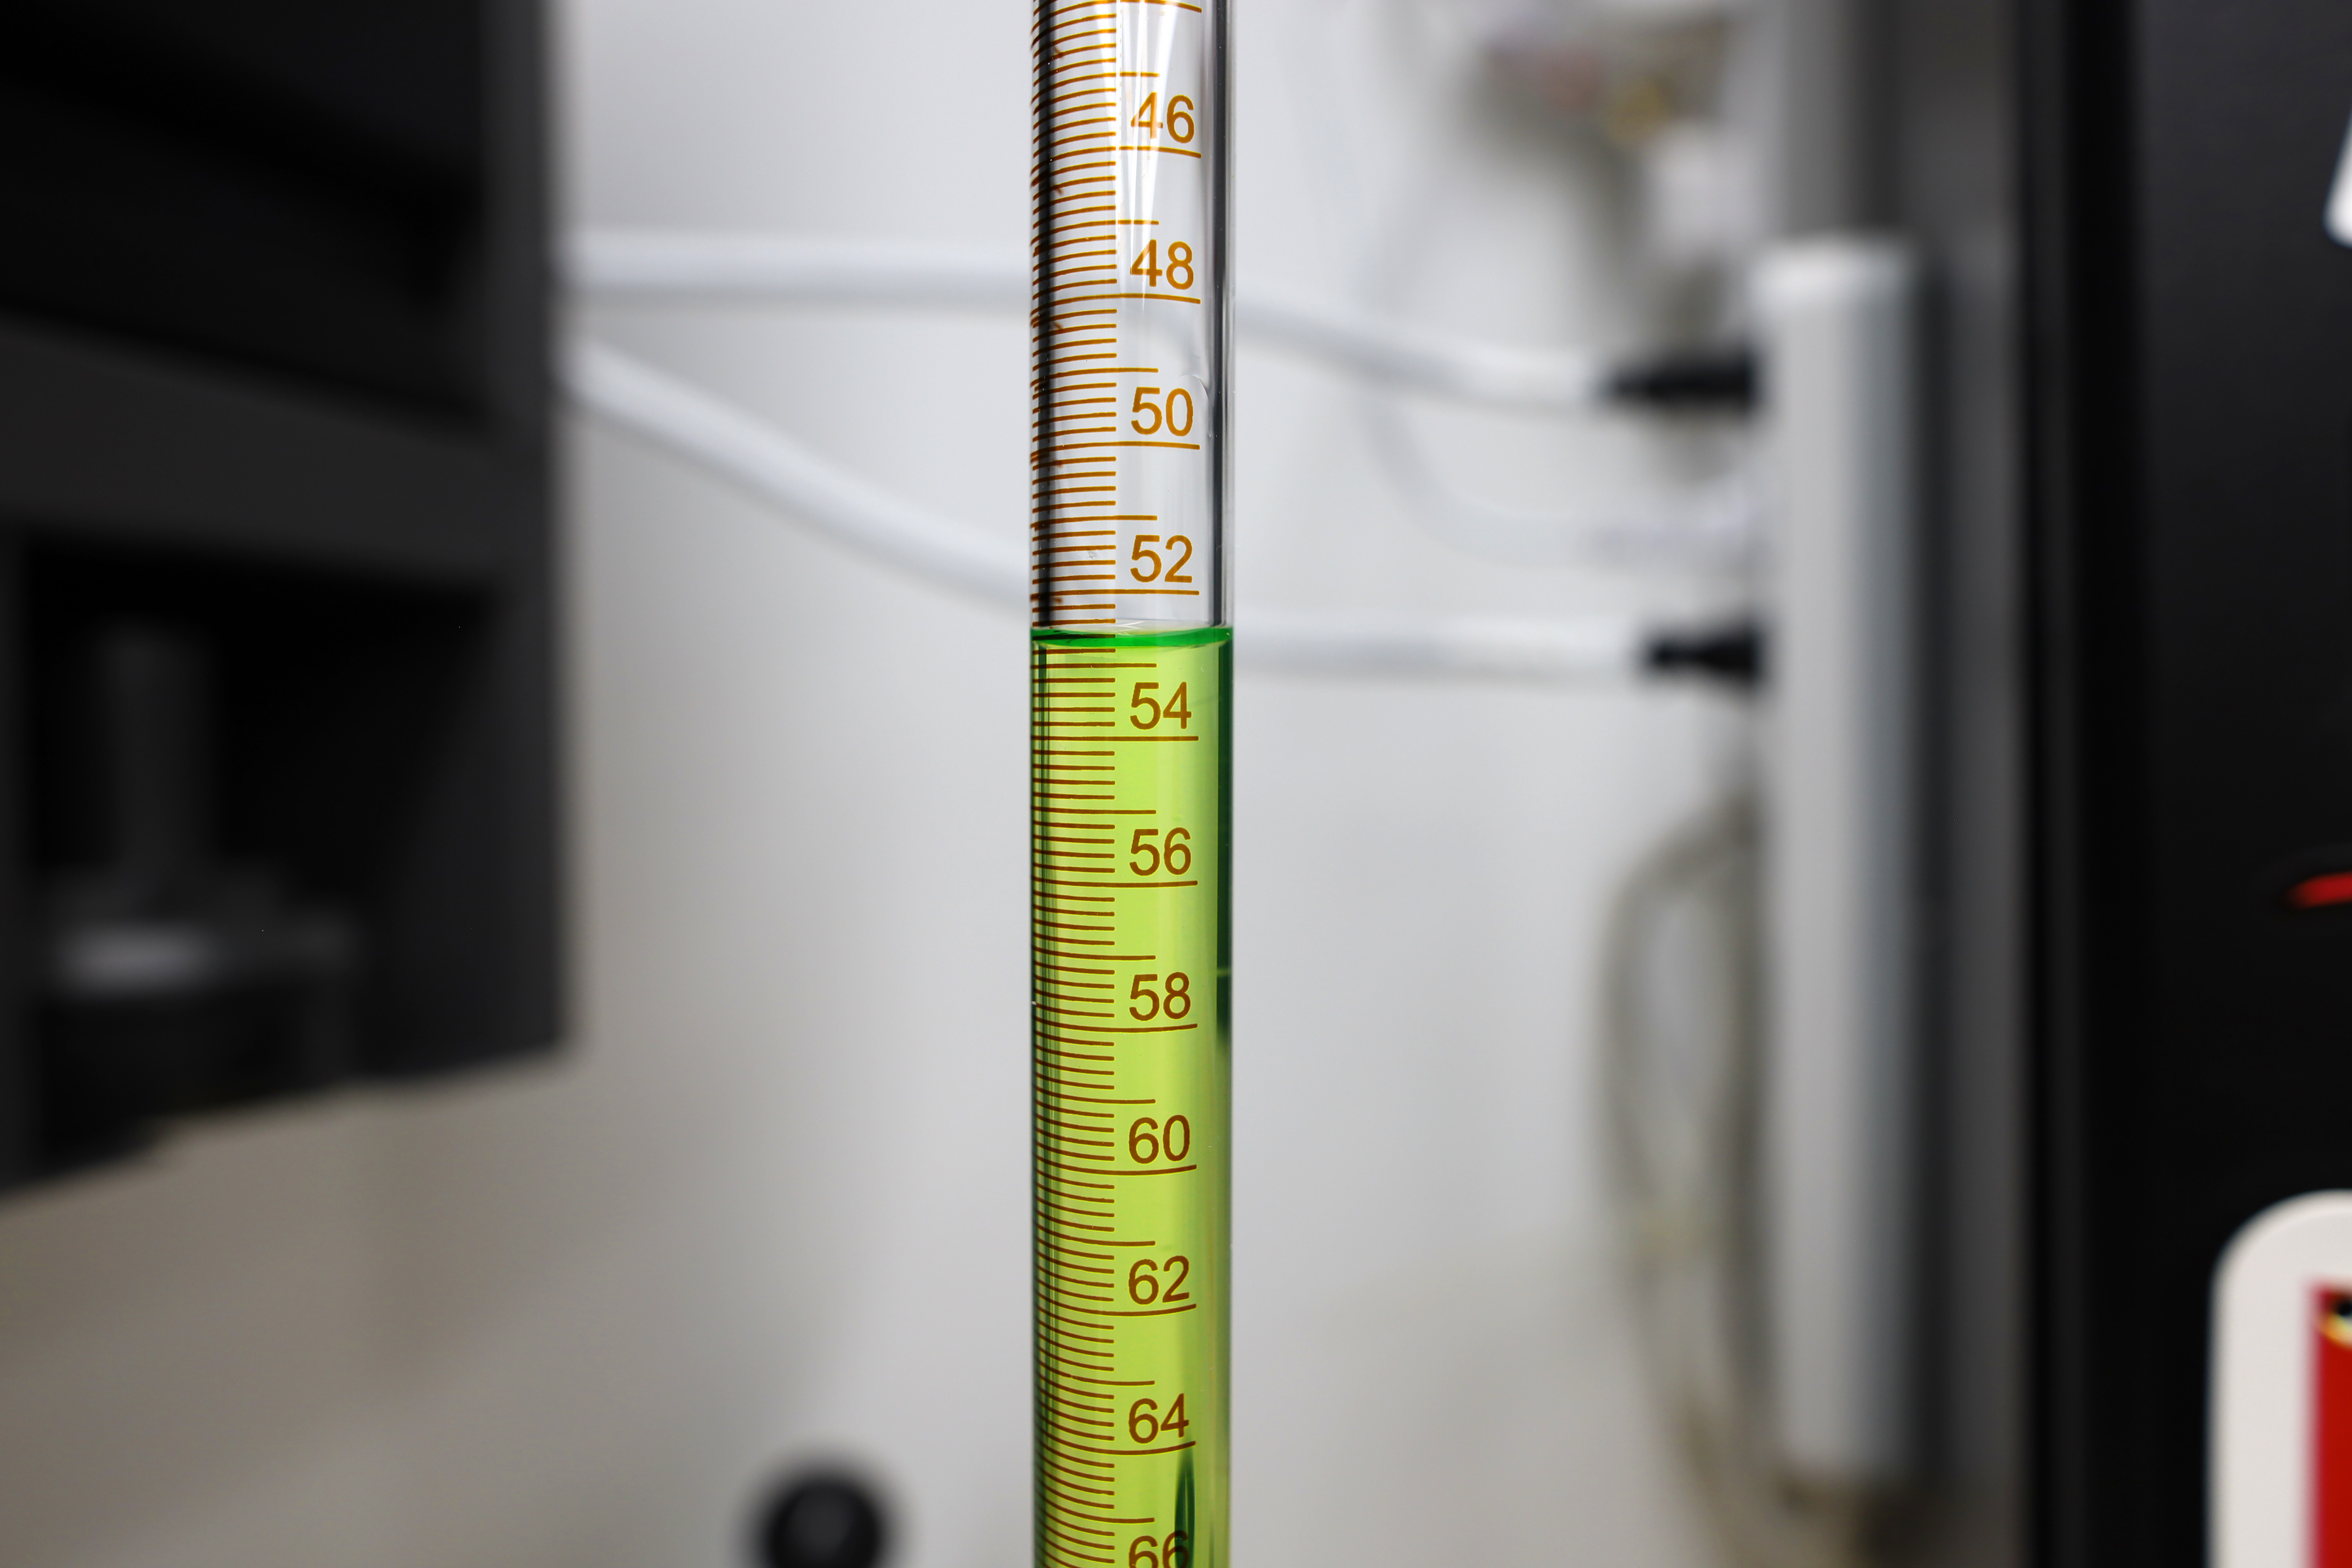
The meniscus is the curvature of the fluid. The correct way to read this is the hash mark corresponding to the level of the bottom of the meniscus. In this case 52.8cc
Filling The Combustion Chamber
With the burette at exactly 100cc, it’s time to start filling the chamber. It’s best to get the tip of the burette as close to the fill port as possible, without blocking escaping air. Once you crack the petcock open, it’s time to watch for splashes or leaks, since any fluid that comes out of the burette needs to be contained in the chamber for an accurate measurement.
If you find leaking valves and lapping the valve and valve seat isn’t an option, you can remove the valvespring and, like the sealing plate itself, apply a thin film of grease to the valve’s register in order to create a liquid-proof seal. Valves and valve seats in good condition should be liquid tight on their own. If you spill any of the liquid while filling, you’ll need to stop, empty the chamber, refill the burette, and start over to ensure accurate measurements.
All said and done, this is a relatively quick and simple process that requires a few tools and a little care to get accurate results.
You might need to chase a few air bubbles, depending on the angle of your head on the bench, and the shape of your combustion chamber. While they might look small, they add up, and can skew your measurement if not expelled from the chamber. Once the chamber is completely full with no air bubbles, you’re done. Now all you have to do is read the level of the remaining fluid and you have your combustion chamber volume.
Measuring your combustion chambers is really 80-percent having the correct tools and setup and 20-percent actually measuring the chambers. As long as you pay attention to the details, anyone is capable of accurately measuring your combustion chamber volume down to the tenth of a cubic centimeter.