Editor’s Note: Longtime automotive journalist and Power Automedia contributor Pete Epple is going heads-up racing in 2016 with the NMCA’s Chevrolet Performance Stock sealed crate motor class with a classic 1967 Chevelle powered by a 6.2L DR525 engine from Scoggin-Dickey Parts Center. This story is part three of a multi-part feature on his project, as the car is transformed from a bracket machine to a heads-up track warrior. Epple will narrate the story, and we will follow his progress, from build preparation to on-track testing and right through the end of the debut season.
Previous Updates: LS Crate Motor Racing Part 1: Chevrolet’s DR525 Sealed Engine, Part 2: Sealed Crate Motor Racing Engine And Drivetrain Prep, LS Crate Motor Racing Part 3 – Fuel System, Suspension, And More
Heads-up racing is ridiculously difficult. Anyone who tells you otherwise has either never done it, or is blatantly lying to you. Now, I’m not naïve enough to think that running a horsepower-limited, heads-up class was going to be easy, but the learning curve is much steeper than I expected. At this point, we have had a few test sessions, some time on the dyno, and made two attempts at competing in races. The whole process of building the car took significantly more time and effort than we had originally anticipated, and that pushed everything else that needed to happen behind it further back. So much so, that the first passes on the car were during the first round of qualifying at the NMCA race in Bowling Green, Kentucky.

I know what you’re thinking and it probably goes something like, “what kind of idiots would make their first pass during qualifying?” The honest answer is, this one! The “sink or swim” mentality, although not always the most efficient way to get things done, forces you to push through any obstacles in the way, and in this circumstance, I would say it worked. The car was worked on relentlessly all weekend, and although the race ended with a first round loss, we still look at the weekend as a huge success.


With each run the car got quicker and faster. The 60-foot times dropped and the car and driver performed better with each pass.
The road to get the Chevelle on track was a long and windy one. When the project started it seemed like a fairly straight and easy path, but it quickly became a twisty, uphill battle. To explain further, a few years ago the car was featured on a television show and a full frame-off “restoration” was performed. While the car looked great on the outside, what waited for us underneath required more fixing and reengineering that anything else. The welds on the floor panels broke, the body didn’t sit flat on the body mounts, front suspension pick-up points had been moved to alleviate other problems instead of fixing them correctly the first time. Needless to say, this added massive amounts of time, headaches, fabrication work, and delays in getting the car to the track.


Over the past three installments of this series, we’ve highlighted what it takes to take an existing race car and reengineer it to go heads-up racing in a semi-affordable class. To that end, we feel the project is huge success. Now, it’s time to make the car work better on track and make a legitimate run at winning races.
We’ve already made some very big strides in a short amount of time. As of this writing, we’ve made 13 passes on the car. Some have been successful, some haven’t, but we’ve gathered great data on every run and now have some experience with different track conditions. Our Racepak Sportsman datalogger has truly been a priceless piece of equipment. It has allowed us to see things happening that we would have never known were going on.


Data is the key to successful testing and the ability to make the right changes to make the car faster. Our Racepak Sportsman datalogger with the OBDII interface is the perfect tool. It allows us to log just about anything to know exactly what the engine is doing. With this information, we've been able to make solid suspension, launch rpm, and torque converter changes.
One of the big things that we’ve seen on every pass (and have yet to get fixed) is tire spin. Some of the passes, including both test sessions, have been done with track conditions that were less than favorable (and that’s being extremely kind). With the OBDII interface, we can also log just about everything the engine is doing in real-time. We can see air and water temp and deduce how these temperatures affect timing. We can also see if and when the ECU is pulling timing. This is extremely helpful when every horsepower counts.
One of the big things that we’ve seen on every pass (and have yet to get fixed) is tire spin.

With the next two attempts, we made minor changes to air pressure (dropped to 14.5 psi) and raised the launch rpm to 4,500, then 5,000 rpm, respectively. We also made fairly significant shock adjustments. On our second pass, the 60-foot time dropped to a 1.48 and the elapsed time to a 10.85 at the same 119 (hitting the limiter sooner at the end of the run). The third round of qualifying saw more improvement, as 60-foot time dropped to a 1.47 on a 10.76-second run — this time we were on the rev limiter for a full three seconds prior to the finish line. The increase in time on the limiter is good data, as it shows that we’re getting to end of the track quicker.


Since the beginning of this project, FTI Performance has been a huge supporter of what we're doing. They have built us an awesome torque converter, which has already gone through a re-stall to help improve performance. With the data we gathered after the first few test sessions, we feel there's some room for improvement by way of the transmission. FTI is in the process of rebuilding our TH400 with some of their custom parts to help the transmission transfer power more efficiently to the tires. Some of these parts include a new valve body, tranbrake, forward drum, and clutches. The newly-rebuilt transmission will be able to handle anything we can throw at it for a very long time to come.
We left the first race with loads of data (some we will share, and some we won’t). Knowing the engine rpm and driveshaft rpm has given us the ability to make smart changes in regards to the torque converter. Like we talked about in an earlier story, FTI Performance built us a custom converter. When we went out on track for the first time, we had no clue if the converter was close or not. But by looking at the data, we were able to figure out that we had 20 percent converter slip at the big end. This was a problem for a couple of reasons. One, it’s wasted power. Two, because the converter was slipping, we were hitting the rev limiter almost three seconds before the finish line. That’s just wasted elapsed time.
Thankfully, Greg and Justin at FTI want us to be fast just as much as we do! To that end, the converter was sent back and the stall and launch profile was changed. When we went back to the track, we saw a huge reduction in converter slip, now with just 10 percent. While this still may be higher than some of our competitors that claim 5-7 percent, we still have a 20-year old, backyard-built TH400 behind it. To take the ridiculousness of this just a bit further, the transmission sat with fluid in it for probably 8 or 10 years before being put back in the car. The point is, a percentage of our 10 percent converter slip might actually be the inefficiency of an old transmission.
With the new converter installed, we headed to Bradenton Motorsports Park for some testing. Unfortunately, it took us four passes to get a decent hold of the less-than-favorable conditions. We took advantage of a poor starting line and tried to find a setup that would allow us to make a clean pass. The first pass netted a 1.62 60-foot and the car headed straight for the tree when the button was let go. Even with all the spin and poor short time, the car still went 10.86 at 123 mph. The first pass was run with the 6,600 rpm rev limiter for a back-to-back comparison for the re-stalled converter. After this pass, the new ECU with the 7,000 rpm rev limiter was installed.


Video is a huge part of our testing regiment. Video is taken of every pass and then slowed down and blown up to see exactly what the car is doing. In this series, you can see we were hitting the tires way too hard. The violent application of power, coupled with low air pressure, would cause the wheel to literally bounce off the ground, inducing tire spin. These are some of the issues we would never be able to correctly diagnose without being able to see it.
The second and third attempt show no significant changes in 60-foot or e.t., but we gained some data on what wasn’t going to work. For the fourth pass we made some major shock changes, and it paid off. The car went a 1.50 60-foot, which was the best of the night so far, and the car went 10.66 at 124 mph. On the fifth pass we let the car cool longer than before. We have found this engine combination is incredibly sensitive to heat. We also made a large change in tire pressure, dropping it to 10 psi. On this pass the 60-foot time dropped to a 1.48. Unfortunately, a missed shift made it a throw away run. We let the car cool and brought it back up. This time the 60-foot was an even quicker 1.47, and a clean pass netted us a 10.63 second at 124 mph. We were happy with the car’s performance, but the transmission felt “mushy”, for lack of a better term, on the shifts.
After the second set of passes and new data, the transmission was pulled from the car and shipped to FTI for a complete overhaul. While in theory our TH400 can handle every bit of power our sealed LS3 makes, we need to get that power to the tires as efficiently as possible. Though we haven’t made passes with the new transmission yet, we’re hoping to see lower 60-foot times, crisper shifts, and a reduction in elapsed time.
Heads-up racing is ridiculously difficult. Anyone who tells you otherwise has either never done it, or is blatantly lying to you.
The range of compression and rebound settings of our Viking Performance shocks has given us all the control we could ask for. We’ve stayed on the conservative side throughout most of our testing when it comes to shock setup. We’ve kept the front end tied down to prevent almost all traces of wheelstands, and have also been working to control the hit of the rear tires. This is very much a trial and error process, and we simply haven’t made enough hits to find the sweet spot yet. We have fought varying levels of tire spin when we let go of the transbrake, but through each session, we’ve gained valuable data and dropped the 60-foot with each attempt.
Scaling the car has also been extremely important. We rolled into the first race 115 pounds under weight. We added the weight to make the race, but in the process, found where the car was unbalanced. The split front to rear is good, but the left/right splits required some weight to be moved around. This weight placement will allow us to balance the car so it goes perfectly straight every pass.
Another factor that’s been a help with getting the car to launch correctly has been weight. When we rolled into Bowling Green for the first race, we hadn’t even had time to put the car on the scales to see what it weighted. The base weight for the class is 3,200 pounds with the driver. I’m not going to sugarcoat it … I’m not a small guy. With me tipping the scales at 260 and the car not being on much of a diet, I was honestly expecting to roll across the scales anywhere from 75-100 pounds heavy. You can imagine my shock when the scales lit up at 3,085.
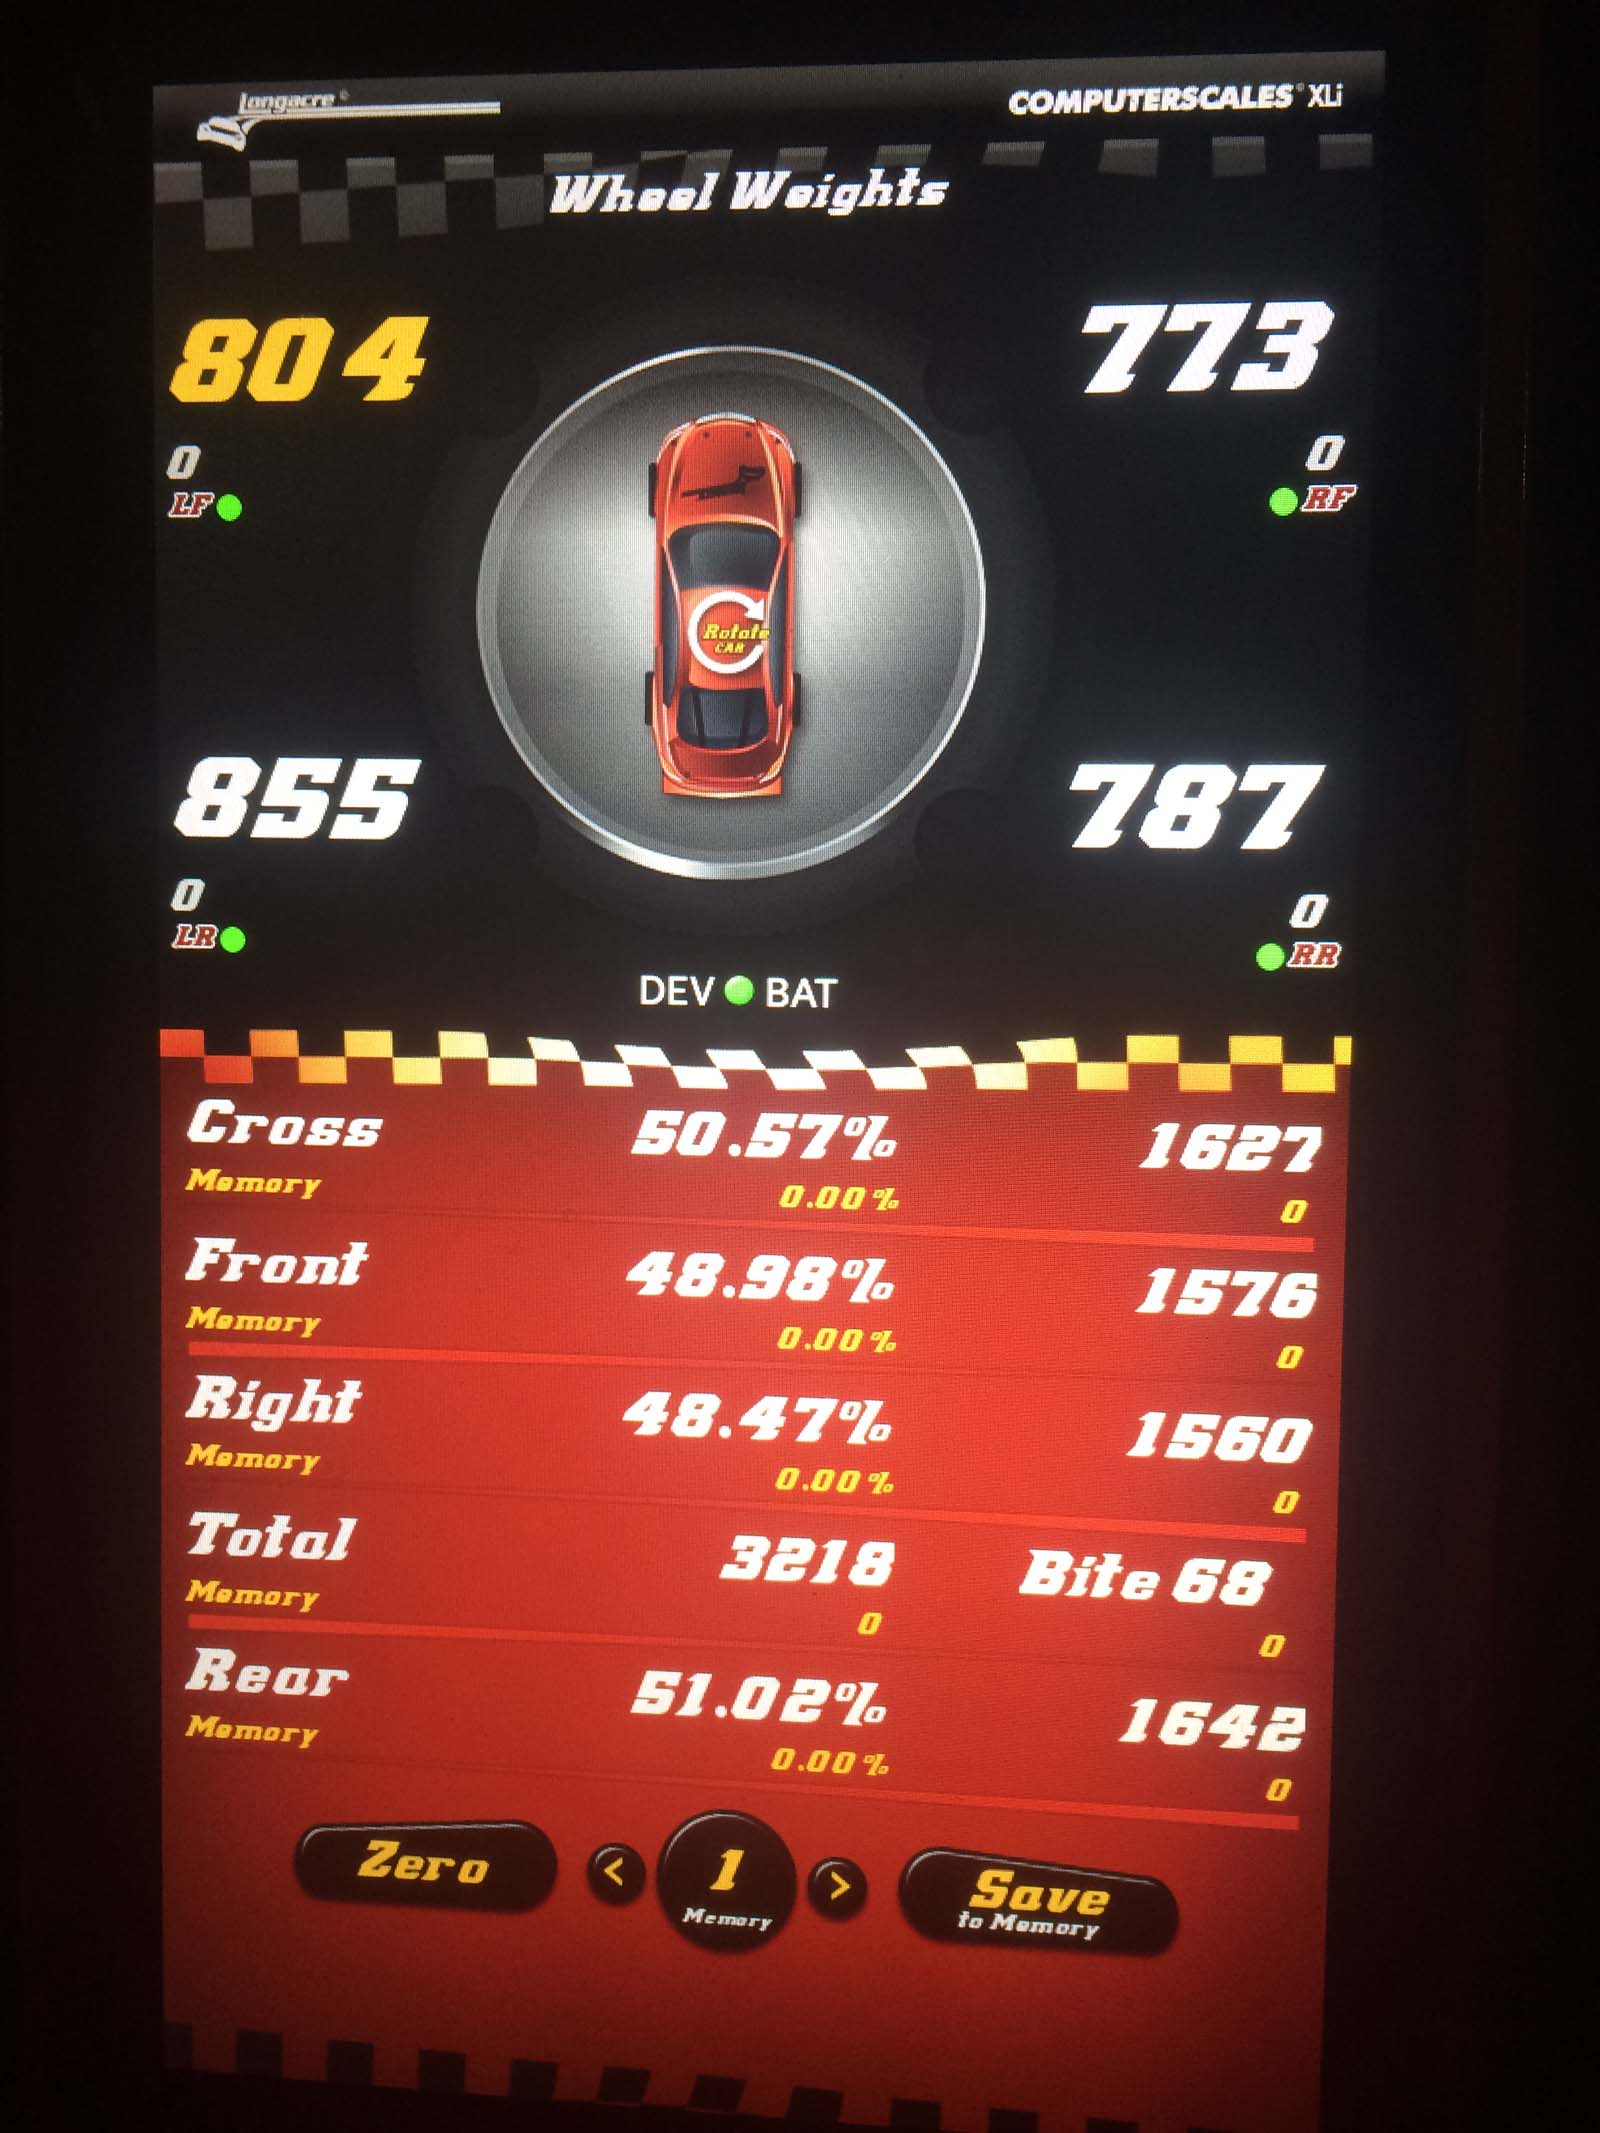
The weight balance stats on the Chevelle, measured at all four corners.
The old Chevelle was way lighter than I ever thought it would be. Although a good problem to have, being 115 pounds underweight is still a problem. To make the car legal, we borrowed some lead from another racer and picked up some weights at Wal-Mart. All of the weight was added to the center of the car, directly over the rearend in an effort to change the suspension setup as little as possible. The gamble worked and suspension was spot-on. At just about any point on track I could have let go of the wheel and the car would track perfectly straight. Since that weekend we’ve played on the scales a bit and added weight where we want it to best balance the car and the chassis. At race weight, the car tips the scales at 3,220, giving us a little cushion for the variance in scales.
With almost two months before the next race we plan on attending, we now get some much-needed chassis dyno time at Blow-By Racing. We have been fighting some heat issues that have been pulling ignition time on track, but these are things we should be able to tackle with no problem in the controlled environment on the dyno. With the changes to the transmission and the ability to test a variety of different things on the dyno, the next time we hit the track we expect a considerable improvement in performance. We have a few sets of new E3 spark plugs and spark plug wires to try, and we may test a couple of different engine oils. Without the ability to tune the ECU, we need to free up any horsepower we can. In a class like this, 10 or 15 horsepower over the guy next to you can be all the difference.
Although this story concludes the series on our sealed engine Chevelle build, we will still bring you updates after each race this season. Depending on how everything goes, we may try to one more story in the off-season and make some bigger changes to the car in an effort to go faster. Until then, we’ll see you at the track!